
How to Bake in Makeup?
Welcome to the world of baking in makeup! Just like baking in the kitchen, baking in makeup is a popular technique that can help you achieve a flawless finish that lasts all day.
In this article, we will explore the history of baking in makeup, discuss the benefits of this technique, and guide you through the step-by-step process. We will also share tips and tricks to help you avoid cakey makeup and tailor the baking method to different skin types and makeup looks.
Get ready to elevate your makeup game with baking!
Key Takeaways:
What is Baking in Makeup?
Baking in makeup is a technique that involves setting certain areas of the face with a translucent powder to create a long-lasting and flawless finish.
Baking in makeup allows the powder to sit on the skin for an extended period, helping to absorb excess oils and lock in the foundation and concealer, resulting in a smooth and creaseless look.
- Translucent powder is a key product used in baking as it sets the makeup without adding additional color, ensuring a seamless blend with the skin tone.
- Concealer is often applied before baking to brighten the under-eye area and cover imperfections, enhancing the overall makeup look.
- Foundation serves as the base for baking, providing an even skin tone and texture before the setting powder is applied.
What is the History of Baking in Makeup?
The history of baking in makeup dates back to the drag queen community, where it was used to set heavy theatrical makeup for long-lasting wear and a flawless appearance.
This technique involved applying a thick layer of translucent powder to the skin and allowing the body heat to ‘bake’ or set the foundation and concealer underneath, creating a creaseless finish. Over time, baking in makeup moved from the drag scene to mainstream beauty routines, thanks to its ability to prevent excess shine, enhance the coverage of products, and provide a smooth base for further makeup application.
Why Should You Bake Your Makeup?
Baking your makeup is essential for achieving a crease-free, matte finish that locks in your face products for a flawless look that lasts all day.
Besides helping you achieve a polished appearance, baking plays a crucial role in the overall makeup routine. By setting your liquid or cream products with translucent powder and allowing them to ‘bake’ into your skin’s warmth, you ensure long-lasting wear without the concern of creasing, especially in delicate areas like under the eyes and around the nose.
This technique not only helps in keeping your makeup intact throughout the day but also enhances the natural contours of your face, creating a smooth canvas for the rest of your products to blend seamlessly.
What Are the Benefits of Baking Your Makeup?
Baking your makeup offers benefits such as extended wear time, minimized creasing, and a smooth, poreless finish that enhances the longevity of your overall look.
When you bake your makeup, you are essentially setting your base using a translucent powder, allowing it to absorb excess oils and lock in your foundation and concealer for a seamless, long-lasting effect. This process helps prevent your makeup from budging throughout the day, making it ideal for special occasions or events where you need your look to stay flawless. By baking specific areas like under the eyes or around the nose, you can refine the texture of your skin, blurring imperfections and creating a perfect canvas for the rest of your makeup application.
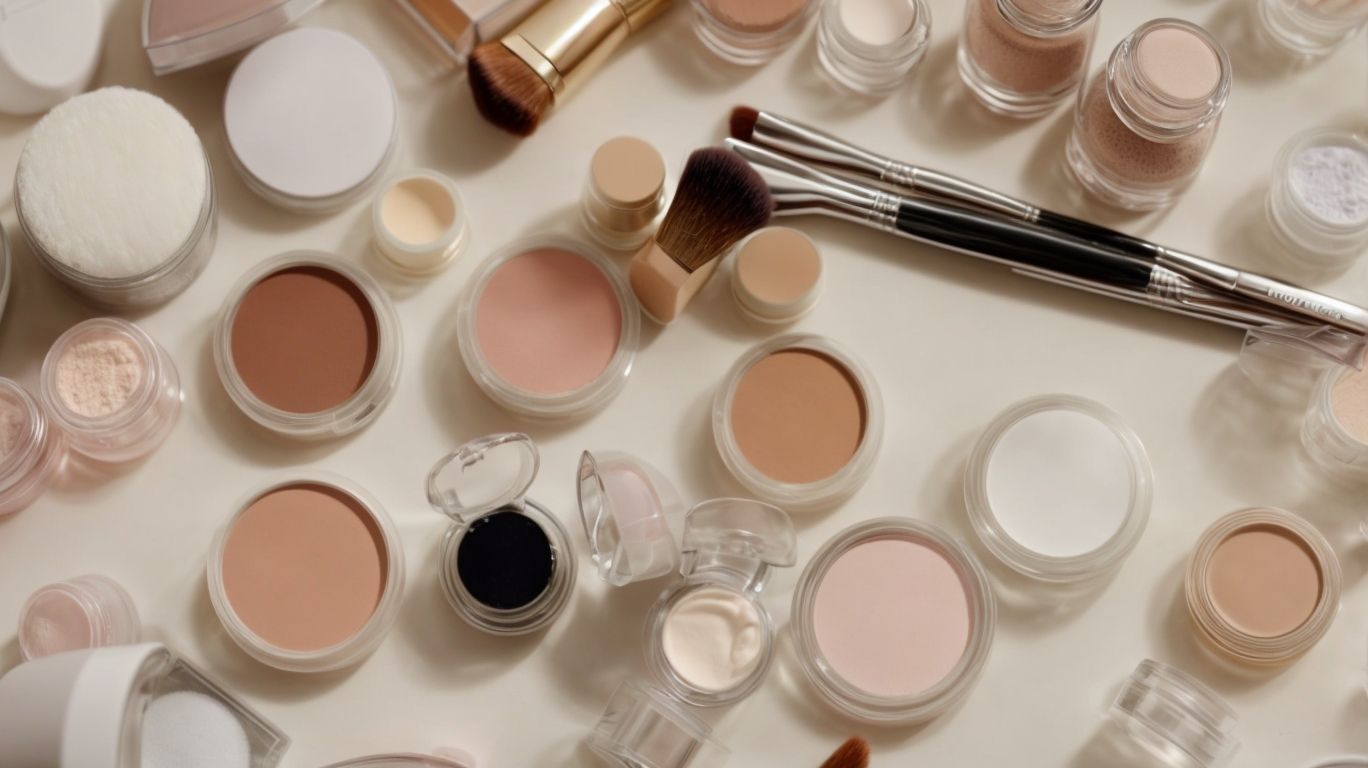
What Products Do You Need for Baking in Makeup?
Credits: Poormet.Com – Richard Hernandez
To bake your makeup effectively, you will need essentials like concealer for coverage, setting powder for a matte finish, and eye makeup products to complement the look.
Regarding achieving a flawless makeup base, concealer plays a crucial role in masking imperfections and dark circles, creating a smooth canvas for the rest of the products. Setting powder is essential to lock in your makeup, control shine, and ensure longevity throughout the day.
Furthermore, eye makeup products such as eyeshadow, eyeliner, and mascara are vital for adding dimension, defining the eyes, and completing the overall makeup look. Opting for quality eye makeup products can enhance the beauty of your eyes and tie the entire makeup ensemble together seamlessly.
What Type of Foundation is Best for Baking?
The best foundation for baking is a full-coverage liquid foundation that provides a flawless base and sets the stage for an impeccable makeup look.
Full-coverage liquid foundation is essential for baking techniques as it offers a higher pigment concentration, ensuring maximum coverage to create a smooth canvas for makeup application. These formulas seamlessly blend into the skin, minimizing imperfections and evening out skin tone.
By opting for a liquid foundation, you can achieve a dewy finish that hydrates the skin while delivering a radiant glow. Its versatile nature allows for buildable coverage, accommodating various makeup styles from natural to full glam looks.
What Type of Powder is Best for Baking?
The best powder for baking is a finely milled setting powder with a velvety texture that ensures a smooth, matte finish without accentuating fine lines or imperfections.
Such powders are formulated to provide a lightweight feel while effectively setting makeup in place for long-lasting wear. Texture is a crucial factor in achieving a flawless finish as it helps in blurring pores and creating a soft-focus effect on the skin. The setting properties of these powders help to control shine and keep oiliness at bay, making them ideal for all skin types.
What Other Products Can Be Used for Baking?
Plus foundation and setting powder, other products like primers, face makeup, and bronzers can be used for baking to enhance the overall look and longevity of the makeup.
Primers play a crucial role in creating a smooth base for makeup application. They help to fill in pores, blur imperfections, and ensure that the makeup stays put throughout the day. Face makeup items such as concealers and color correctors are essential for achieving a flawless complexion before baking. These products help to even out skin tone and cover any blemishes.
Bronzers are perfect for adding warmth and dimension to the face post-baking. They can be used to contour, sculpt, and create a sun-kissed glow, enhancing the overall makeup look. By strategically applying bronzer to the high points of the face, you can achieve a natural and radiant finish.
How to Bake in Makeup Step-by-Step
Credits: Poormet.Com – Logan Scott
Mastering the art of baking in makeup involves precise application techniques, using brushes to set creams and powders in place for a flawless and long-lasting finish.
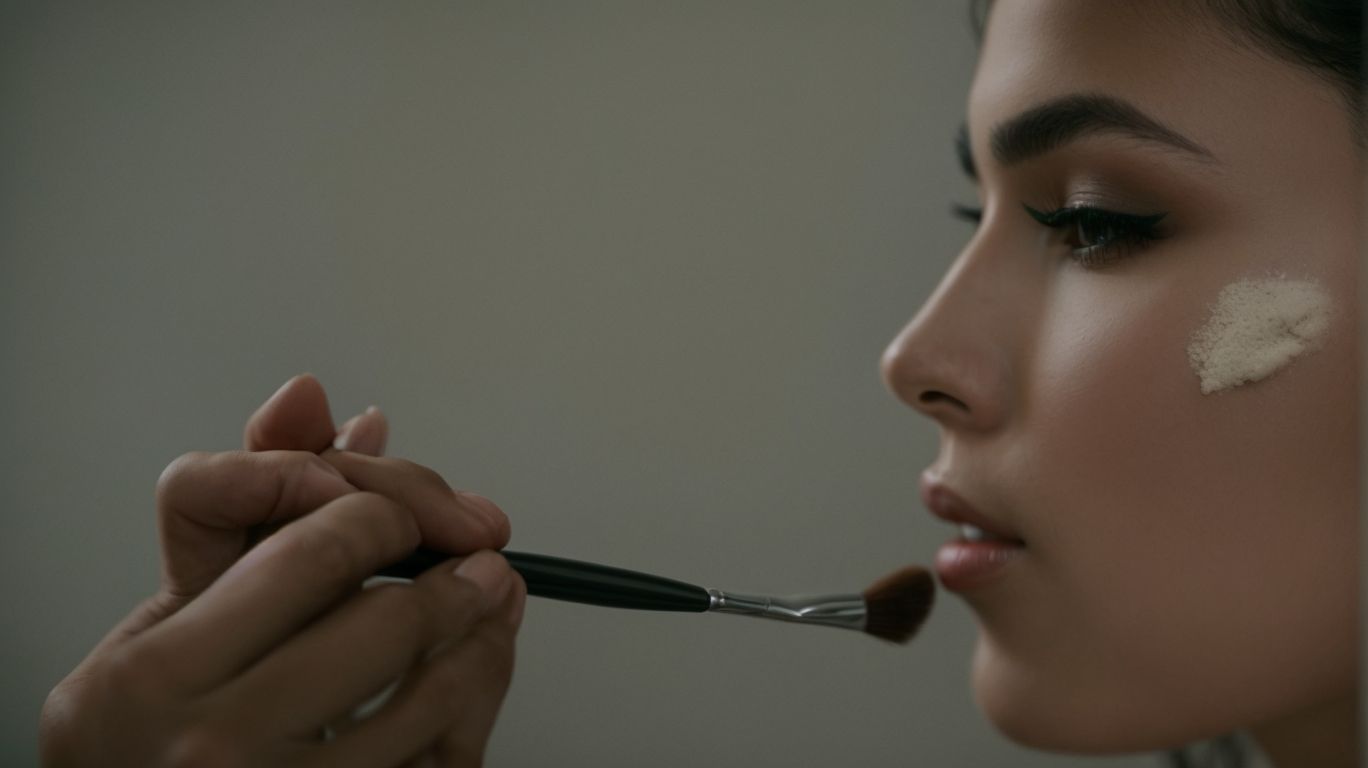
Start by applying your foundation and concealer as usual. Then, take a loose setting powder and brush a generous amount onto the areas you want to bake, typically under your eyes, forehead, chin, and along the jawline. Let it sit for a few minutes to allow the heat from your skin to set the product.
Next, using a smaller brush, gently sweep away the excess powder to reveal a perfectly set base. The brush you choose here is crucial – opt for a fluffy, tapered brush to ensure precise application without disturbing the makeup underneath.
For the eyes, dab a small amount of eye cream on the lid before packing on the eyeshadow. This not only helps the shadows adhere better but also prevents creasing throughout the day.
Step 1: Prep Your Skin
Before starting the baking process, it’s crucial to prep your skin by applying a hydrating primer that smoothens the texture and creates a flawless base for makeup application.
Hydrating primers are essential as they not only help in retaining skin moisture but also aid in creating a smooth canvas for makeup products to adhere to. By applying a primer, you are essentially providing a barrier between your skin and the makeup, preventing cakiness and promoting a more even application.
Primers come in various formulations tailored to different skin types, so selecting the right one for your face can also address specific concerns like pores, fine lines, or uneven skin tone.
Step 2: Apply Foundation
Apply a full coverage liquid foundation using a foundation brush to achieve a flawless, full glam look that serves as the base for the baking technique.
When applying a liquid foundation for baking makeup, ensure that the shade matches your skin tone to create a seamless transition. A foundation brush helps distribute the product evenly, covering imperfections and creating a smooth canvas for the rest of the makeup application. Blending is key here; make sure there are no harsh lines or streaks. This step sets the stage for a stunning, polished makeup finish that lasts all day. Remember, less is more with liquid foundation. Start with a small amount and build up as needed for that perfect, flawless finish.
Step 3: Apply Concealer
Conceal any imperfections with a high coverage concealer, especially in the under-eye area, to complement the foundation and create a flawless canvas for baking.
Regarding the delicate eye area, choosing the right concealer is crucial to avoid creasing and ensure a seamless finish. Opt for a creamy formula with a lightweight texture to effortlessly blend over fine lines and dark circles, providing adequate coverage without settling into wrinkles. Patting the concealer gently using your ring finger helps to delicately cover imperfections while being gentle on the skin. Blending the concealer with the liquid foundation seamlessly enhances the overall coverage, ensuring a natural and even complexion.
Step 4: Apply Setting Powder
Use a generous amount of setting powder and a makeup sponge to bake the concealed areas, following the baking technique for a long-lasting and crease-free makeup finish.
Applying setting powder through baking is a crucial step in makeup routines to ensure a flawless look that stays in place for hours.
- By layering the setting powder generously over areas where concealer has been applied, you create a barrier that locks in the moisture, thereby preventing creasing and smudging throughout the day.
For an added longevity boost, make sure to incorporate a quality makeup primer before the application of concealer and setting powder. This not only extends the wear time of your makeup but also provides a smooth canvas for easier blending.
Step 5: Let it Bake
Allow the setting powder to ‘bake’ on the skin for a few minutes, letting the heat from your face activate the products and set the makeup in place for a flawless finish.
During this ‘baking’ process, the body temperature plays a crucial role in helping the setting powder integrate seamlessly with your face makeup. The warmth from your skin aids in melting the products together, creating a long-lasting and smooth result. By giving the powder time to work its magic, you’re essentially ensuring that it adheres well to the foundation and concealer underneath, minimizing the chances of creasing or smudging throughout the day.
Step 6: Dust Off the Powder
Gently dust off the excess powder using a fluffy brush to reveal a flawless, matte finish that seamlessly blends with your liquid foundation and face makeup.
This final step is crucial as it ensures that any excess product is removed, leaving behind a polished appearance. By lightly brushing away the excess powder, you not only set your makeup but also eliminate any cakiness or uneven texture. This technique helps to achieve a smooth and natural finish, making it easier for your face makeup, such as blush or bronzer, to adhere and blend seamlessly across your skin.
Tips and Tricks for Baking in Makeup
To master baking in makeup, consider using a skin mist to set the powders, applying blush after baking for a natural flush, and blending carefully to avoid a cakey finish.
When utilizing a skin mist to set the powders, ensure that it is applied evenly across the face, allowing it to settle before proceeding with the next makeup steps. This step not only helps in enhancing the longevity of your makeup but also aids in preventing creasing, especially in areas prone to it, such as the under-eye region.
After the baking process, adding blush can bring life and dimension back to the skin. Opt for a shade that complements your skin tone and gently apply it to the apples of your cheeks, blending upwards towards the temples for a seamless finish.
Remember that the key to flawless makeup is in the blending. Take your time to blend the products seamlessly, ensuring there are no harsh lines or patches. This step ties everything together and provides a polished look that lasts all day.
How to Avoid Cakey Makeup
To avoid cakey makeup when baking, ensure you use a hydrating primer, opt for lightweight liquid foundations, and blend thoroughly to maintain a natural finish.
Choosing the right primer is crucial as it creates a smooth canvas for foundation application, preventing product buildup. Look for primers that match your skin type, whether it’s oily, dry, or combination.
When selecting liquid foundations, go for formulas that are buildable yet breathable. These types of foundations are less likely to cake up on the skin, providing a seamless coverage that looks natural.
Mastering the art of blending is essential for a flawless makeup look. Use beauty sponges or brushes to blend foundation seamlessly into the skin, focusing on areas that tend to cake up, such as around the nose and chin.
How to Bake for Different Skin Types
Adapt your baking technique based on your skin type by adjusting the amount of powder used, incorporating hydrating setting sprays, and focusing on specific areas that require extra setting.
For oily skin, you may want to concentrate more on setting the T-zone or any areas prone to shine, using a light dusting of powder. On the other hand, if you have dry skin, consider using a damp beauty sponge to set your under eyes and cheeks to avoid a cakey finish. Incorporating a skin mist in your routine can provide an extra boost of hydration and help meld the powders seamlessly into your skin for a more natural look. Remember, it’s all about finding the right balance to achieve a flawless complexion.
How to Use Baking for Different Makeup Looks
Experiment with baking techniques to create diverse makeup looks, focusing on the eye area with precise setting powder application and seamless blending with liquid foundation for varied effects.
Regarding eye area makeup, mastering baking techniques can truly elevate your entire look. By strategically applying setting powder below your eyes and blending it seamlessly with a liquid foundation, you can achieve a flawless, creaseless finish that lasts all day. This method not only helps in brightening and setting the under-eye area, but also provides a smooth canvas for eyeshadow application.
Conclusion
Mastering the art of baking in makeup involves strategic product choices, precise application techniques, and a powder finish that elevates the overall look for a flawless finish that lasts.
Regarding makeup primer, consider it as the canvas on which you’ll create your masterpiece. Choosing the right one will not only improve the longevity of your makeup but also provide a smooth base for baking. Precise application is key here – whether you’re using a damp sponge or a brush, ensure you’re gently pressing the product into the skin for a seamless blend. Achieving that desired powder finish involves setting the makeup in place, locking it for an all-day wear, and minimizing any unwanted shine.
Frequently Asked Questions
How to Bake in Makeup?
Answer: Baking in makeup involves setting your face makeup with powder to create a flawless, long-lasting finish. Here’s how you can do it:
What products do I need to bake in makeup?
Answer: To bake in makeup, you will need a setting powder, a damp beauty sponge, and a flat powder brush.
Can I bake in makeup with any setting powder?
Answer: It’s recommended to use a loose, translucent setting powder for baking. However, you can also use a pressed powder for a less intense effect.
How do I choose the right shade of setting powder for baking?
Answer: When baking in makeup, it’s important to choose a setting powder that is one to two shades lighter than your skin tone. This will give you a brightened, highlighted effect.
Do I have to bake in makeup for a specific amount of time?
Answer: The time you leave your setting powder on to “bake” will depend on your personal preference and the type of powder you’re using. Generally, 5-10 minutes is recommended.
How often should I bake in makeup?
Answer: Baking in makeup is not necessary for daily makeup routines but can be done for special occasions or when you want a more intense, long-lasting finish. It’s important not to overdo it, as it can be drying for the skin.