
How to Bake Scones Without Yeast?
Craving a delicious, fluffy scone but don’t have any yeast on hand? Look no further!
This article explores yeast-free scones, from their history to the benefits of baking without yeast. It also covers the essential ingredients you’ll need and provides step-by-step instructions for creating the perfect yeast-free scones.
Grab your apron and get ready to bake up a batch of these delightful treats!
Key Takeaways:
What Are Scones?
Scones are a type of baked bread or cake that originated in Scotland and are popular in English afternoon tea.
These delectable treats have been a staple in British culture for centuries, with their roots tracing back to the early 1500s in Scotland. Historically, scones were an integral part of the Scottish tea-time tradition, enjoyed with clotted cream and jam.
Over time, scones have evolved to encompass a wide array of flavors and ingredients, ranging from classic fruit scones with currants or raisins to savory varieties like cheese and herb scones. This versatility has made them a versatile option for breakfast, brunch, and even as a snack.
Traditionally, scones are served on special occasions such as Victorian tea parties or high teas, where they add a touch of elegance and indulgence to the affair. Their association with tea-drinking rituals continues to make them a cherished delight across the United Kingdom and beyond.
History of Scones
The history of scones dates back to the early 1500s in Scotland, where they were originally made with oats and cooked on a griddle.
Over time, scones evolved from their humble oat beginnings to incorporate wheat flour, butter, and leavening agents such as baking powder. This transformation led to a lighter, fluffier texture that scone enthusiasts know and love today. The traditional method of cutting butter into the dry ingredients to create a crumbly mixture is a crucial step in achieving the perfect scone consistency. These delectable treats gained popularity across the United Kingdom and beyond, with each region putting its unique spin on the classic recipe.
Why Bake Without Yeast?
Baking without yeast offers a quicker alternative for creating delicious scones without the need for fermentation time.
This method is particularly advantageous for those looking to whip up baked goods in a pinch, as yeast-free baking recipes typically involve fewer steps than traditional yeast-based recipes.
By eliminating the fermentation process, yeast-free baking also simplifies the overall recipe, making it more accessible for novice bakers who may be intimidated by working with yeast.
Opting for yeast-free baking can help individuals avoid potential digestive issues or sensitivities related to yeast consumption, providing a more gentle option for those with specific dietary requirements or preferences.
Benefits of Baking Without Yeast
Baking without yeast can lead to scones with a more dense and crumbly texture, perfect for certain scone variations like fruit scones.
One advantage of yeast-free baking is the unique texture it imparts to scones. The absence of yeast results in a denser and crumblier consistency, offering a delightful contrast to the light and airy texture of yeast-raised baked goods. This texture is particularly suited for scones that are meant to be sturdy yet tender, such as:
- cheddar and chive scones
- rosemary and Parmesan scones
- cranberry orange scones
When to Bake Without Yeast?
Choosing to bake without yeast is ideal when you want to enjoy freshly baked scones without the waiting time required for yeast fermentation.
Yeast-free baking is perfect for busy mornings or spontaneous gatherings where time is precious, and you crave the delicious warmth of a scone straight from the oven. Imagine waking up to the aroma of warm, freshly baked treats without the hassle of proofing yeast or waiting for dough to rise. With yeast-free recipes, you can mix, shape, and bake scones in a matter of minutes, making it a go-to option for those spontaneous moments when you want to treat yourself and others to a delightful bakery experience.
Ingredients for Yeast-Free Scones

Credits: Poormet.Com – Randy Hernandez
To make yeast-free scones, you will need flour, baking powder, sugar, salt, butter, and milk or cream as the essential components.
Flour acts as the main base and provides structure to the scones, while baking powder is crucial for leavening without the need for yeast. Sugar not only adds sweetness but also helps with browning and texture. Salt enhances the overall flavor profile, balancing the sweetness.
- Butter contributes to the scones’ richness and flakiness, creating those desirable layers.
- For dairy, you can choose between milk or cream depending on the desired texture and richness. Cream will yield a more luxurious texture, while milk will result in a lighter scone.
Flour
Flour is the primary dry ingredient used in scone recipes, providing structure and volume to the dough.
Regarding choosing the right type of flour for your scones, you have several options.
- All-purpose flour is a popular choice, known for its versatility and ability to create a balanced texture in scones.
- Self-rising flour contains baking powder and salt, making it a convenient option for those looking to streamline the baking process.
- Whole wheat flour adds a nutty flavor and hearty texture to scones, perfect for those seeking a more wholesome treat.
The type of flour you select will greatly influence the final outcome of your scones, with each variety imparting its unique characteristics. Whether you prefer a light and fluffy scone or a denser, more substantial one, the choice of flour plays a crucial role in achieving the desired texture and consistency of your baked goods.
Baking Powder
Baking powder is a leavening agent that helps scones rise and become light and fluffy without the need for yeast.
When combined with moisture and heat, the baking powder releases carbon dioxide gas bubbles, which expand during baking and cause the scones to rise. This process is key to achieving that sought-after texture of a tender crumb with a light, airy interior.
The chemical action of baking powder, which typically contains a combination of an acid and a base, ensures that the scones puff up evenly and maintain their structure throughout the baking process. The right balance of ingredients, including the proportions of baking powder, is crucial for the perfect scone. Too much can result in a bitter taste, while too little may lead to a dense and flat outcome.
Sugar
Sugar adds sweetness to scones and also aids in browning during the baking process, enhancing flavor and appearance.
Sugar plays a crucial role in the texture of scones by contributing to their tenderness and crumb structure. The type of sugar used can also impact the final outcome; for instance, using granulated sugar will create a slightly crunchy exterior, while powdered sugar can result in a more delicate, melt-in-your-mouth feel.
Adjusting the amount of sugar in a scone recipe allows for customization based on personal preference – adding more sugar can produce a sweeter scone, whereas reducing the amount can cater to those who prefer a less sweet option.
Salt
Salt is a crucial ingredient in scone recipes as it enhances the overall flavor profile and balances the sweetness of other ingredients.
In scone preparation, salt serves multiple purposes beyond just adding a savory element. It plays a key role in activating the yeast, which helps in dough development and rising. Salt helps to strengthen the gluten structure, providing the scones with a desirable texture and crumb.
When considering different scone variations, such as savory scones with cheese or herbs, it’s important to adjust the salt quantity accordingly to complement or contrast with the additional flavors. Finding the right balance of salt is essential for achieving the perfect scone every time.
Butter
Butter is a key ingredient in scone recipes, contributing to the richness, tenderness, and flavor of the final baked product.
When incorporated into the scone dough, butter not only adds a rich and indulgent flavor but also plays a crucial role in creating a tender crumb texture that is characteristic of a well-made scone. The fat content in butter helps inhibit the formation of gluten when the dough is mixed, resulting in a softer texture. Depending on the type of butter used, such as unsalted, salted, or even clarified butter, the flavor profile of the scones can vary significantly. Some bakers opt for methods like freezing the butter before incorporating it into the dry ingredients to create a flakier texture in the final baked scones.
Milk or Cream
Milk or cream is used in scone recipes to provide moisture, richness, and binding properties to the dough, resulting in tender and flavorful scones.
When milk is added to the scone dough, it enhances the tenderness of the final product as the proteins and fats in the milk contribute to a softer texture. The fat content in cream lends a richness that elevates the flavor profile of the scones. For those looking to avoid dairy, alternatives like almond milk, coconut cream, or even yogurt can be used in place of milk or cream, offering a different taste profile while still retaining the essential moisture and binding functions.
Step-by-Step Instructions for Baking Yeast-Free Scones
Credits: Poormet.Com – Peter Williams
Follow these step-by-step instructions to bake delicious yeast-free scones that are perfect for any occasion.
To start, gather all the necessary ingredients for your yeast-free scones. You’ll need flour, baking powder, sugar, salt, butter, milk or dairy-free alternative, and any additional mix-ins like dried fruits, chocolate chips, or nuts.
In a large mixing bowl, combine the dry ingredients – flour, baking powder, sugar, and salt. Cut the cold butter into small cubes and add it to the dry mixture. Using your fingertips, rub the butter into the flour until it resembles breadcrumbs. Gradually stir in the milk until a soft dough forms.
Preheat the Oven
Begin by preheating your oven to the specified temperature mentioned in the scone recipe for optimal baking results.
Preheating the oven is a crucial step in the baking process as it ensures that the oven reaches the required temperature before you put the scones in. This helps in achieving consistent and even baking throughout. When the oven is properly preheated, it allows the scones to rise and cook evenly, preventing them from becoming overly dry or undercooked. By following the recommended temperature settings in the recipe, you set the stage for deliciously golden and perfectly baked scones.
Mix Dry Ingredients
Combine the dry ingredients such as flour, baking powder, sugar, and salt in a mixing bowl and whisk them together to ensure even distribution.
Whisking the dry ingredients is a crucial step in scone-making as it helps in achieving a homogeneous mixture, preventing clumps or uneven pockets of ingredients in the final product. Uniform blending is key to ensure that each bite of the scone delivers a consistent flavor and texture throughout. By evenly distributing the flour, baking powder, sugar, and salt, you create a solid foundation for the scone batter, which will impact its rise during baking.
Depending on the desired flavor profile, you can customize the dry ingredient combination. For instance, adding lemon zest to the dry mix can infuse a refreshing citrusy note into the scones, while incorporating cinnamon or nutmeg can create warm, aromatic undertones in the final product.
Cut in Butter
Cut the butter into small cubes and incorporate it into the dry ingredients using a pastry blender or your fingertips until the mixture resembles coarse crumbs.
One important aspect of making scones is the technique used to incorporate the butter into the dough. By keeping the butter cold, you ensure that it stays solid during the mixing process, creating those desirable flaky layers in the final product. The texture of the butter-flour mixture should ideally be mealy with pea-sized butter pieces scattered throughout, which will help in creating a light and tender scone.
If you don’t have a pastry blender, an alternative method is to grate the frozen butter using a box grater. This grated butter can then be gently mixed into the dry ingredients, ensuring it stays cold and maintains its structural integrity during baking.
Add Milk or Cream
Pour in the milk or cream gradually into the dry mixture while stirring gently until a soft, slightly sticky dough forms.
When incorporating milk or cream into the scone dough, the key is to strike the right balance between moisture and texture. If the dough seems too dry, add a tablespoon of milk at a time, ensuring thorough mixing before each addition. Conversely, if the dough appears too wet and sticky, sprinkle a bit of flour and gently fold it in until reaching the desired consistency.
For classic plain scones, a slightly tacky dough is preferred, while for fruit scones, a more sticky consistency works well to hold the fruits together. Cheese scones, on the other hand, benefit from a drier dough texture to facilitate shaping and cutting.
Shape and Cut the Dough
Shape the scone dough into a round disc and use a sharp cutter to cut it into individual scones of desired shapes, such as triangles or circles.
Once you have your round disc of dough, gently press down on the cutter without twisting to create clean cuts. For triangle scones, simply cut the disc into wedges like a pizza. If you prefer smaller scones, you can use a smaller cutter or divide the dough into smaller portions before shaping.
For a fun twist, consider using cookie cutters to create heart-shaped or star-shaped scones. You can also experiment with free-form shapes by gently shaping the dough by hand for a rustic appearance.
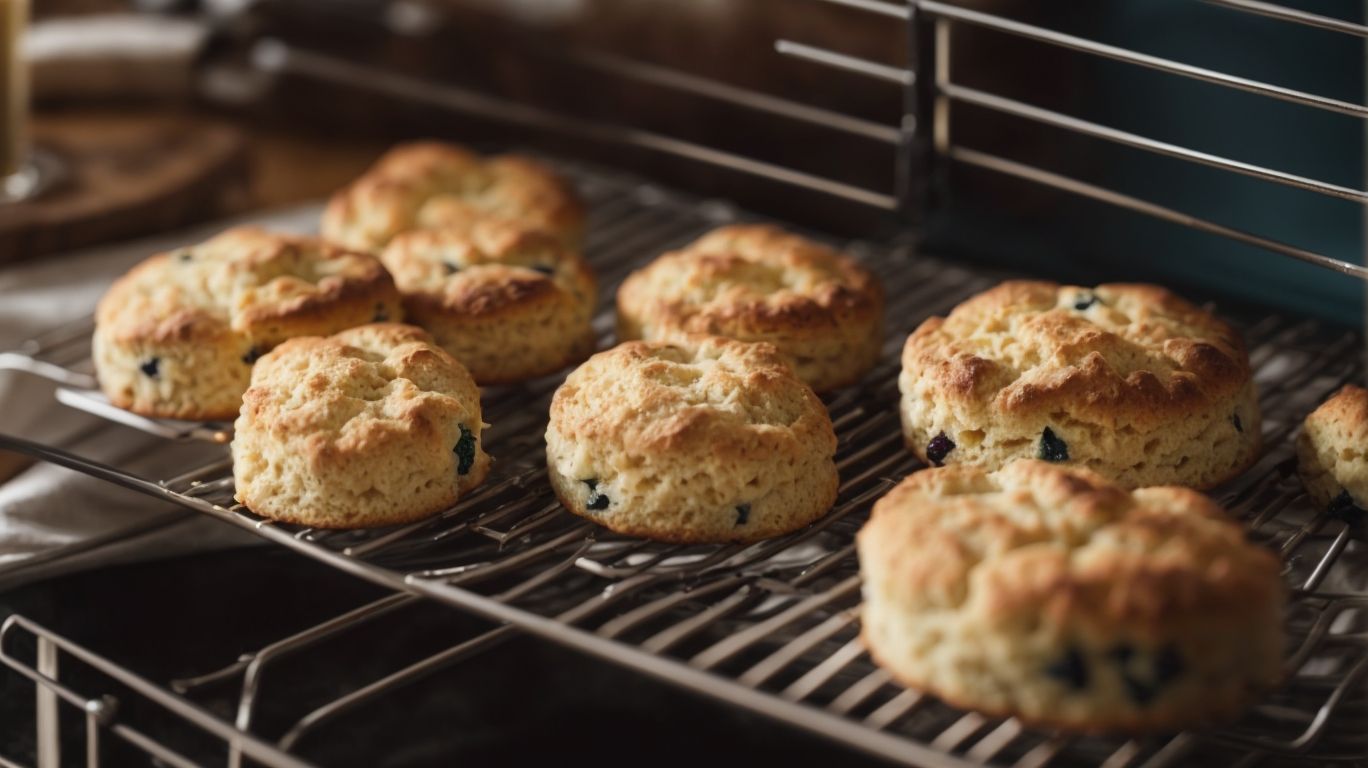
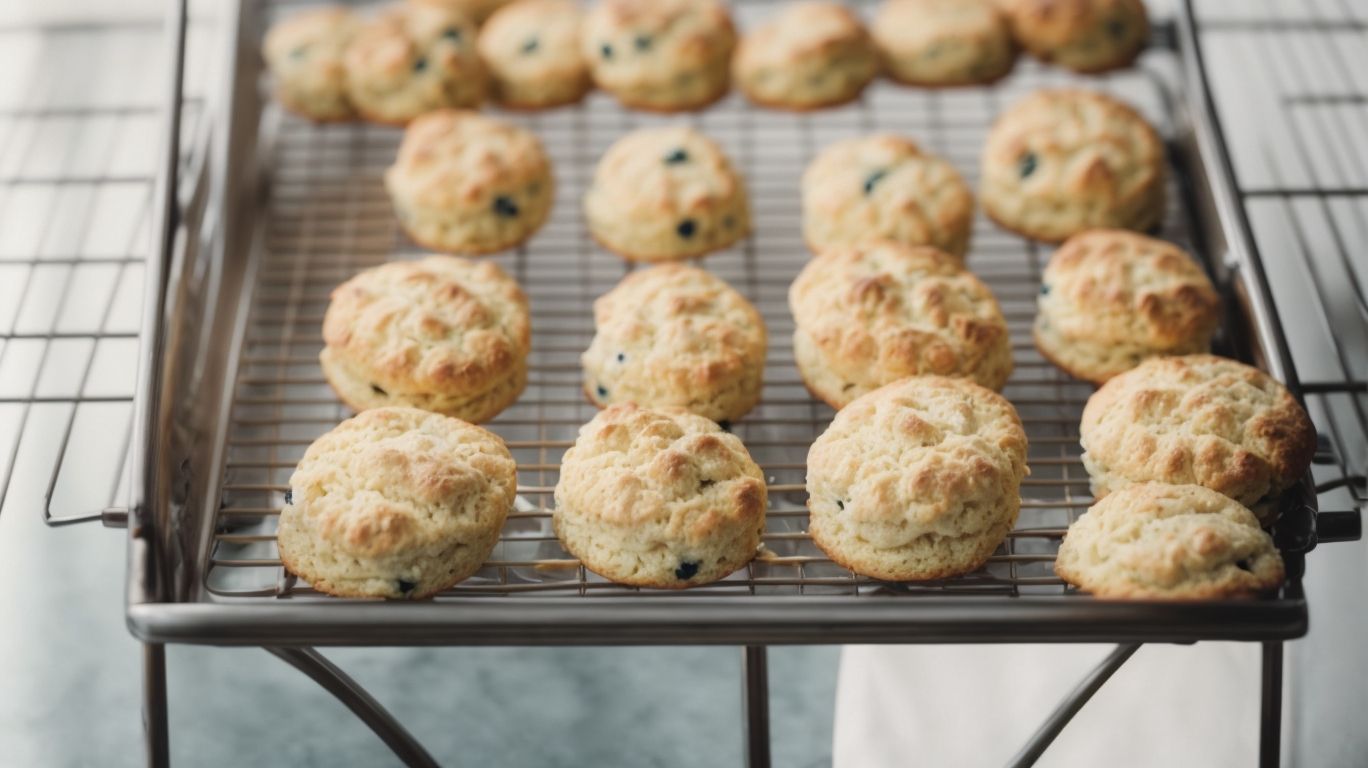
Bake the Scones
Place the shaped scones on a baking sheet lined with parchment paper and bake them in a preheated oven until they turn golden brown and are well-risen.
To achieve the perfect texture in your scones, keep in mind that the oven temperature plays a crucial role. Preheat the oven to 400°F (200°C) for traditional scones, but adjust it to 375°F (190°C) for a softer texture. The baking time typically ranges from 15-20 minutes, but start checking after 12 minutes. You’ll know they’re ready when the tops are beautifully browned and a toothpick inserted into the center comes out clean. For added flair, brush the tops with cream before baking for a golden finish.
Tips for Perfect Yeast-Free Scones
Credits: Poormet.Com – Edward Rodriguez
Follow these expert tips to ensure your yeast-free scones turn out fluffy, delicious, and perfectly baked every time.
Start by sifting your dry ingredients, like flour, baking powder, and a pinch of salt, to ensure a light and airy texture in your scones.
Use cold butter and work it into the flour mixture until you achieve a crumbly texture, which will help create those sought-after flaky layers in your baked goods.
Consider adding a touch of sweetness with a hint of honey or sugar, and feel free to throw in some raisins, berries, or chocolate chips for an extra burst of flavor.
Remember to handle the dough gently and avoid overmixing to prevent toughness in your scones.
Use Cold Ingredients
Using cold butter and chilled milk or cream helps maintain the dough’s consistency and ensures the scones rise properly during baking.
When cold ingredients like butter and milk are incorporated into the dough, they keep the fat from melting prematurely, which is essential for creating the characteristic flaky texture of scones. This preservation of fat structure allows for steam to form during baking, leading to those delightful pockets of air that contribute to a light and tender crumb.
Cold ingredients help slow down gluten development, preventing the scones from becoming tough. By maintaining a low temperature in the ingredients, the butter remains solid until the scones are placed in the oven, where it then melts and releases steam, giving them the desired lift.
Don’t Overwork the Dough
Avoid excessive kneading or mixing of the scone dough to prevent gluten development and ensure a tender, flaky texture in the baked scones.
Regarding scone dough, less is more – overworking it can lead to tough, dense scones that lack the desired lightness. Understanding the delicate balance between combining the ingredients and preserving the dough’s integrity is key.
To achieve that perfect crumbly yet moist texture, opt for gentle mixing techniques such as folding the ingredients together with a light hand. This approach helps maintain air pockets in the dough, resulting in those sought-after flaky layers once baked.
Use a Sharp Cutter
A sharp cutter helps create clean edges when cutting scone dough, promoting even rising and attractive shapes in the final baked scones.
Using a sharp cutter is essential not just for the visual appeal of the scones but also for ensuring that they bake uniformly, resulting in a delightful texture and flavor. When the dough is cleanly cut, it allows for consistent expansion during baking, leading to evenly baked scones with a professional finish.
- For flaky and buttery scones, a sharp knife or pastry cutter is ideal
- Cookie cutters, on the other hand, can be used for decorative shapes or smaller-sized scones
Brush with Egg Wash
Applying an egg wash on the scones before baking adds a glossy finish and golden color to the crust, enhancing the visual appeal of the baked scones.
For those unfamiliar with the process, creating an egg wash is simple yet crucial in achieving that perfect scone exterior. To make the wash, beat one egg with a tablespoon of milk or water until well combined. Use a pastry brush to delicately coat the scones with this mixture just before placing them in the oven.
The egg proteins in the wash coagulate during baking, forming a protective layer that traps moisture inside the scones, resulting in a tender crumb while also providing a shiny, golden crust.
If you’re looking to experiment, consider adding a touch of honey or maple syrup to the egg wash for a slightly sweeter glaze, or sprinkle some sesame seeds on top before baking for added texture and flavor.
Conclusion
Mastering the art of baking yeast-free scones opens up a world of flavorful possibilities using simple ingredients and traditional techniques.
Whether you prefer sweet or savory flavors, yeast-free scones offer endless adaptations to suit your taste. From classic combinations like blueberry and lemon to more adventurous pairings such as cranberry and orange zest, there is a scone recipe for every palate. Experiment with different fruits, nuts, herbs, and cheeses to create unique scone variations that cater to your cravings. The process of making homemade scones is not just about the end result but also about the therapeutic joy of kneading dough and the delightful aroma wafting through your kitchen.
Frequently Asked Questions
What is the best substitute for yeast when baking scones?
There are a few options for substituting yeast in scone recipes, including baking powder, baking soda, and a combination of both. You can also use self-rising flour as a replacement.
Can I use sourdough starter instead of yeast for scones?
Yes, sourdough starter can be used in place of yeast in scone recipes. Keep in mind that the sourdough will add a tangy flavor to the scones, so adjust the other ingredients accordingly.
How do I make sure my scones rise without yeast?
To ensure that your scones rise without yeast, make sure to use a leavening agent like baking powder or baking soda. Also, be sure to handle the dough gently and avoid overworking it.
Do I need to let the scone dough rest before baking?
Yes, it is recommended to let the scone dough rest for about 10-15 minutes before baking. This allows the gluten to relax and helps the scones to rise better.
Can I use milk instead of buttermilk in yeast-free scone recipes?
Yes, you can use regular milk instead of buttermilk in recipes that call for yeast-free scones. You can also make your own buttermilk substitute by adding a tablespoon of white vinegar or lemon juice to a cup of milk.
Do I need to adjust the baking time when making scones without yeast?
Yes, the baking time may need to be adjusted when making scones without yeast. Keep an eye on the scones and check for doneness by inserting a toothpick in the center. If it comes out clean, the scones are ready.