How to Cook Chicken Kiev Without Leaking?
Have you ever wondered what exactly Chicken Kiev is and how to make it without it leaking all over the pan?
We will explore the delicious dish of Chicken Kiev, its key ingredients, and step-by-step instructions on how to prepare it.
Learn some expert tips on how to cook Chicken Kiev without it leaking, ensuring a perfect and flavorful outcome every time.
Discover all about this classic and mouth-watering dish!
Key Takeaways:
What is Chicken Kiev?
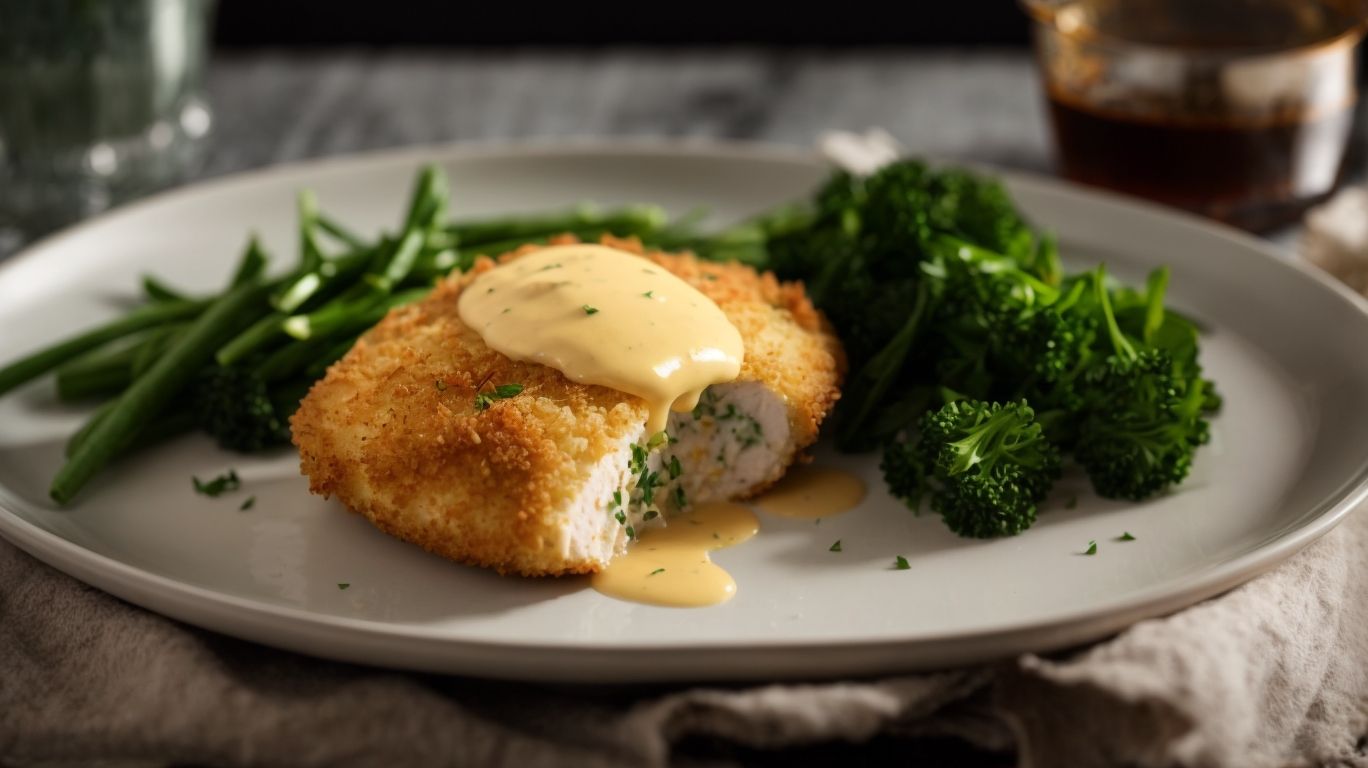
Credits: Poormet.Com – Charles Brown
Chicken Kiev is a classic dish made of chicken breasts wrapped around garlic butter and herbs, then breaded and baked until golden and crispy.
Originating from Ukrainian cuisine, Chicken Kiev is a beloved dish that brings together tender chicken, rich buttery flavors, and a satisfying crunch. To prepare this comforting meal, start by pounding out chicken breasts to create thin cutlets. Spread a generous amount of garlic butter and herbs onto each cutlet before carefully rolling them up to encase the flavorful filling. Next, dredge the chicken rolls in seasoned breadcrumbs to lock in moisture and create a crispy exterior when baked.
This dish is adored for its warm, indulgent qualities, making it perfect for cozy fall evenings. Chicken Kiev has become a popular recipe choice for those looking to enjoy a hearty and flavorful meal that is sure to impress.
What Ingredients Do You Need to Make Chicken Kiev?
To make Chicken Kiev, you will need chicken breasts, butter, parsley, breadcrumbs, and garlic as the essential ingredients.
Each ingredient plays a crucial role in creating the classic flavors of Chicken Kiev. The chicken breasts provide the base for the dish, tender and juicy once cooked. Butter adds richness, ensuring a decadent and flavorful filling. Fresh parsley brings a hint of herbaceous freshness to balance the richness. Breadcrumbs serve as the crispy coating that locks in the flavors and adds a delightful crunch.
The garlic infuses the filling with its aromatic essence, enhancing the overall taste profile. When selecting ingredients, opt for high-quality chicken breasts, preferably organic, as they offer superior taste and texture. Use unsalted butter for better control of the dish’s saltiness and ensure the parsley is fresh and vibrant. Experiment with variations by incorporating different herbs like dill or tarragon and seasoning options like paprika or lemon zest to customize the flavor profile to your liking.
Chicken Breast
Chicken breasts are the primary protein component in Chicken Kiev, providing a tender and juicy texture to the dish.
Selecting high-quality chicken breasts is crucial for ensuring a flavorful and satisfying Chicken Kiev. Look for fresh, plump breasts that are free of any discoloration or off-putting odors. Before preparing the dish, it’s essential to properly trim and pound the chicken breasts to an even thickness. This not only helps the meat cook evenly but also ensures a consistent texture throughout. Handle the chicken with care to prevent any contamination, keeping a clean work area and washing your hands thoroughly after each step.
Butter
Butter, especially garlic-infused butter, plays a crucial role in Chicken Kiev, adding richness and flavor to the dish.
Creating flavored butter logs for stuffing is a simple yet impactful process. To make garlic butter, blend softened butter with finely minced garlic, parsley, salt, and pepper. Form the mixture into a log using plastic wrap and let it chill until firm. This flavored butter can be sliced and used for stuffing the chicken, infusing it with a burst of savory goodness. The butter not only keeps the meat moist during cooking but also imparts a delightful garlic flavor throughout the dish. Experiment with different herbs and seasonings to customize your flavored butter logs to suit your taste preferences.
Herbs and Spices
Herbs like parsley and a blend of seasoning such as salt and pepper enhance the aromatic profile of Chicken Kiev.
Aside from parsley, other herbs often used in Chicken Kiev include dill, chives, and tarragon, each contributing its unique flavor notes to the dish. The seasoning not only adds a subtle saltiness but also serves to bring out the natural flavors of the chicken.
Experimenting with different herbs and seasoning combinations can cater to individual taste preferences, with options ranging from a more traditional approach to bolder, spicier variations. Some popular herb variations for Chicken Kiev include thyme, rosemary, or even a hint of lemon zest for a refreshing citrus twist.
Breadcrumbs
Breadcrumbs, especially panko breadcrumbs, are used to create a crispy and golden coating on the outside of Chicken Kiev.
This outer layer not only adds a wonderful crunch but also helps seal in the juices of the chicken, making each bite a delightful experience. When breading your Chicken Kiev, ensure to set up a breading station with three shallow dishes: one for flour, another for beaten eggs, and the last one for breadcrumbs mixed with seasonings like salt, pepper, and herbs for added flavor.
For a neat and even coating, gently press the chicken into the breadcrumbs, ensuring all sides are well covered. If you want an extra crispy finish, you can repeat the dipping process after the initial breading layer has dried slightly.
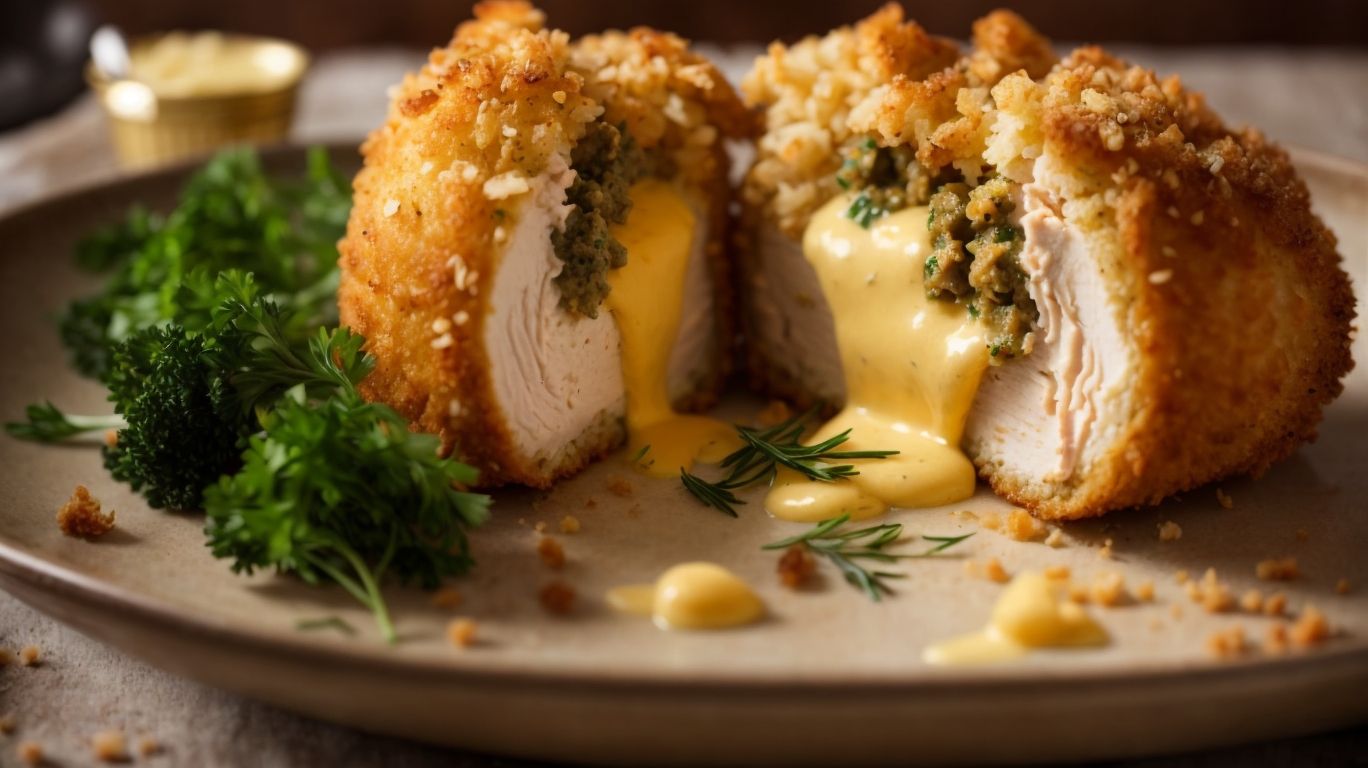
To prevent butter from leaking out during baking, make sure the seams of the chicken are tightly sealed and secure. You can also refrigerate the chicken for 30 minutes before baking to help the coating adhere better and reduce the chances of leakage.
Egg
Eggs are used to create a seal around the chicken breast, ensuring the butter and filling stay intact during the cooking process.
When preparing a Chicken Kiev, the eggs play a crucial role in binding all the flavors together within the tender chicken. To properly seal the dish, you’ll want to gently coat the stuffed chicken breast in a thin layer of beaten egg. This egg coating creates a protective barrier that helps secure the buttery goodness inside.
- One key tip is to ensure that the chicken breast is properly sealed by firmly pressing the edges together. This step helps prevent any leakage of the delicious filling during cooking.
- If the seal is not formed securely, the butter inside may start oozing out, resulting in a loss of flavor and potentially a messy dish. To avoid this, make sure to seal the chicken Kiev carefully and thoroughly before cooking.
How Do You Prepare Chicken Kiev?
Preparing Chicken Kiev involves pounding the chicken breast, seasoning the butter, breading, wrapping, and sealing to create a delicious stuffed dish.
Once you have flattened the chicken breast to an even thickness, carefully season the chilled butter mixture with herbs and spices. The high-quality compound butter plays a key role in the flavor profile of this classic dish.
Regarding stuffing the butter inside the chicken, make sure to evenly distribute it across the surface before folding and sealing the edges securely to prevent leakage during cooking.
After the stuffing is complete, gently dip the prepared chicken in flour, then egg, and finally coat it with a generous layer of breadcrumbs for that perfect crunchy exterior.
Pound the Chicken Breast
Pounding the chicken breast ensures even thickness, promoting tender and consistent cooking in the Chicken Kiev dish.
By pounding the chicken breast, you not only ensure that it cooks evenly throughout, but you also create a surface that is conducive to even browning. This step is vital as it prevents the thinner parts from overcooking while the thicker sections remain undercooked, resulting in a perfectly cooked dish.
Regarding proper pounding techniques, it’s important to use a meat mallet or a rolling pin to gently flatten the chicken. Start from the center and work your way outwards to achieve uniform thickness without tearing the meat.
The impact of proper pounding is significant on the final texture of the Chicken Kiev. The evenly pounded meat results in a consistent texture that is juicy and flavorful, enhancing the overall dining experience.
Season the Butter
Seasoning the butter with garlic and herbs infuses rich flavors into the filling of Chicken Kiev, enhancing its overall taste.
To season the butter for Chicken Kiev, start by allowing the butter to soften at room temperature for easy blending with the herbs and garlic. Selecting the right herbs is crucial for achieving a delicious flavor profile. Classic choices like parsley, chives, and tarragon work well, but you can also experiment with rosemary, thyme, or dill for a unique twist. Vary the amount of each herb to suit your taste preferences, whether you prefer a more herbaceous or subtle flavor in your butter. Consider adding a hint of lemon zest or a pinch of paprika for added complexity.
Roll the Butter in Breadcrumbs
Rolling the seasoned butter logs in breadcrumbs creates a flavorful and textured filling for Chicken Kiev, adding depth to each bite.
First, you will need to shape the seasoned butter into compact logs. This can be easily done by rolling the butter mixture into cylindrical shapes using plastic wrap or parchment paper. Once you have the logs ready, gently roll them in breadcrumbs until they are evenly coated.
Coating the butter logs with breadcrumbs not only adds a crispy outer layer when cooked, but it also helps to seal in the flavors and moisture of the butter, resulting in a decadent and succulent filling for the Chicken Kiev. This step is crucial in ensuring that each bite is bursting with deliciousness and has the perfect balance of textures.
Wrap the Chicken Breast Around the Butter
Wrapping the seasoned butter filling inside the pounded chicken breast requires a delicate technique to ensure even distribution and flavor balance.
Once you have prepared the chicken breast by pounding it evenly, carefully place a generous helping of the butter filling in the center of the breast. Use the natural shape of the chicken breast to your advantage in enclosing the filling. Pull one side of the chicken breast over the filling, tuck in the sides to secure the filling in place, and then roll it tightly to form a neat package. Ensuring a secure seal at this stage is crucial to prevent the filling from leaking out during cooking.
Seal the Edges
Sealing the edges of the chicken breast is crucial to prevent the butter from leaking during the baking process, ensuring a flavorful and intact dish.
One effective method to prevent butter leakage is to properly wrap the chicken breast in a tight roll, ensuring no openings for the butter to escape. Before sealing, you can pound the chicken breast to an even thickness, making it easier to seal effectively. To achieve a perfectly sealed Chicken Kiev, it’s recommended to double-coat the chicken in breadcrumbs before sealing, creating an extra barrier against leakage. Remember to chill the wrapped chicken before baking to help the butter remain solid inside during the cooking process.
How Do You Cook Chicken Kiev Without Leaking?
Cooking Chicken Kiev without leaking butter involves high heat, proper skillet selection, careful flipping, and adequate resting time before serving.
For ensure your Chicken Kiev stays deliciously buttery on the inside and perfectly crispy on the outside, it’s crucial to start with the right kind of pan. A heavy-bottomed skillet is ideal for even heat distribution, preventing hot spots that could cause the butter to leak out prematurely.
When you’re ready to cook, preheat your skillet over medium-high heat. It should be hot but not smoking, as excessive heat can cause the butter to melt too quickly. One handy trick is to test the temperature by flicking a few drops of water onto the pan – they should sizzle and evaporate almost instantly.
Use High Heat
Using high heat in the oven ensures a crispy and golden exterior on the Chicken Kiev while sealing the butter filling inside.
High heat is crucial for achieving that perfect crunch and caramelization on the outside, creating a contrast with the rich, savory filling inside, making each bite a delightful experience. When the oven temperature is too low, the chicken may end up steaming rather than roasting, resulting in a soggy coating. For optimal results, preheat the oven to 400°F (200°C) and bake the Chicken Kiev for about 20-25 minutes, or until the internal temperature reaches 165°F (74°C). This high-heat method ensures a juicy interior and a crisp, flavorful exterior for a classic Chicken Kiev.
Use a Cast Iron Skillet
Cooking Chicken Kiev in a cast iron skillet provides even heating and a suitable cooking surface for achieving a crispy and well-cooked dish.
The use of a cast iron skillet enhances the flavor profile of the Chicken Kiev by imparting a subtle smoky essence to the dish. The remarkable heat retention of cast iron ensures that the chicken remains tender and juicy.
Regarding maintenance, cast iron skillets are durable and long-lasting, making them a sustainable investment for your kitchen arsenal. Proper seasoning and cleaning are essential to keep the skillet in optimal condition. Remember to avoid harsh detergents and always dry the skillet thoroughly to prevent rusting.
If you prefer non-stick cookware, high-quality stainless steel or ceramic skillets can be used as alternative options for cooking Chicken Kiev. These materials offer similar heat distribution properties and are relatively easier to clean.
Don’t Overcrowd the Pan
To prevent steam buildup and ensure even cooking, refrain from overcrowding the pan when preparing multiple Chicken Kiev pieces.
When the pan is overcrowded, the Chicken Kiev pieces end up steaming rather than browning properly. This can result in a lack of crispy texture and uneven cooking. Giving each piece enough space allows them to cook evenly and develop a golden crust.
Proper spacing between the Chicken Kiev pieces ensures that they are not touching each other, which allows heat to circulate around each piece effectively. This prevents them from sticking together and promotes the desired crispy exterior.
When managing the pan capacity, consider using a larger skillet or cooking the Chicken Kiev in batches if necessary. This avoids overcrowding and guarantees that each piece has enough room to cook properly.
Flip the Chicken Kiev Carefully
Carefully flipping the Chicken Kiev during cooking ensures even browning and a golden crust on both sides of the dish.
When you reach the halfway mark in the cooking process, it’s time to perform the crucial flip. Use a spatula to gently lift the Chicken Kiev from one side so that it doesn’t break apart. The timing is key here – you want to wait until the first side is perfectly golden before flipping, but not too long that the other side burns. By mastering this technique, you’ll achieve a deliciously crispy exterior while keeping the juicy filling intact.
Let the Chicken Rest Before Cutting Into It
Allowing the Chicken Kiev to rest before cutting into it ensures that the juices redistribute, resulting in a tender and flavorful final dish.
Resting meat after cooking is a critical step often overlooked but can make a significant difference in taste and texture. When the Chicken Kiev is taken off the heat, its internal temperature remains high, causing the juices to move towards the surface. If it is cut immediately, those flavorful juices will spill out onto the plate, leaving the meat dry.
Resting the chicken for about 5-10 minutes allows the juices to redistribute throughout the meat evenly. This redistributes the flavors, creating a juicy and succulent bite with each slice. The tenderizing process continues during this resting period, leading to a more tender and moist Chicken Kiev.
Frequently Asked Questions
What is Chicken Kiev and why is it prone to leaking during cooking?
Chicken Kiev is a classic dish made with chicken breast filled with garlic butter and herbs, and then breaded and fried. It is prone to leaking because the filling can melt and leak out during cooking, resulting in a dry and less flavorful dish.
How can I prevent my Chicken Kiev from leaking during cooking?
One way to prevent leaking is to make sure the filling is well-sealed inside the chicken breast before breading and cooking. You can also try freezing the filled chicken breasts for 30 minutes before cooking to help the filling solidify and stay in place.
What are some common mistakes that can cause Chicken Kiev to leak?
One common mistake is using too much filling, which can lead to leaking. Another mistake is not properly sealing the chicken breast or not using enough breading to hold the filling in.
Can I use an air fryer to make Chicken Kiev without leaking?
Yes, using an air fryer can help reduce the chances of leaking because the enclosed cooking environment helps to keep the filling in place. Just be sure to follow proper sealing and breading techniques.
Are there any alternative ingredients I can use for the filling to prevent leaking?
Yes, you can try using a cream cheese or cheese-based filling instead of butter, as these tend to hold their shape better when heated. You can also add some flour or breadcrumbs to your filling to help thicken it and reduce the chances of leaking.
Is it possible to make a lower-fat version of Chicken Kiev without worrying about leaking?
Yes, you can try baking the chicken instead of frying it, using a light coating of oil and breadcrumbs. You can also experiment with using a healthier filling, such as a blend of herbs and spices, to add flavor without the risk of leaking.