How to Cook Chickpeas After Soaking Overnight?
Are you a fan of chickpeas but unsure about the benefits of soaking them overnight?
Explore why soaking chickpeas overnight is essential and how it can enhance their nutritional value. Learn how to prepare and soak chickpeas and get step-by-step instructions on cooking them after soaking.
Discover the secrets to perfectly cooked chickpeas that will elevate your culinary creations!
Key Takeaways:
Why Soak Chickpeas Overnight?
Soaking chickpeas overnight is a crucial step in the cooking process that offers several benefits and helps in preparing delicious chickpea recipes.
When chickpeas are soaked, they absorb water, which helps soften them and reduce the cooking time. This process also aids in digestion and nutrient absorption by breaking down complex sugars and proteins present in chickpeas. Furthermore, soaking enhances the overall texture of the cooked chickpeas, resulting in a creamier and more tender consistency.
What are the Benefits of Soaking Chickpeas Overnight?
Soaking chickpeas overnight offers numerous benefits such as improved texture, enhanced taste, and increased digestibility, making them easier to cook and incorporate into various dishes.
By soaking chickpeas, you allow them to absorb water, resulting in a softer texture that cooks more evenly and tenderly. This process also helps to reduce the cooking time significantly, saving you time in the kitchen. Soaking helps to break down the complex sugars in chickpeas, making them easier to digest and reducing the likelihood of bloating or digestive discomfort.
When soaked, chickpeas become more receptive to absorbing flavors and spices, enhancing the overall taste profile of your dishes. The softened texture also makes it easier to blend chickpeas into creamy hummus or incorporate them into hearty stews and salads.
How to Prepare Chickpeas for Soaking
Properly preparing chickpeas for soaking is essential to ensure they absorb water effectively and achieve the desired results in your culinary creations.
When selecting chickpeas for soaking, opt for dried chickpeas rather than canned ones, as dried chickpeas rehydrate more evenly. Ensure the chickpeas are clean and free of debris before starting the soaking process. Next, choose a container that is large enough to allow room for the chickpeas to expand as they soak. A glass or ceramic bowl is ideal for this purpose, as it won’t impart any unwanted flavors to the chickpeas. Use fresh, filtered water to soak the chickpeas, covering them with approximately 2 inches of water above the chickpeas to allow for proper hydration.
What Type of Chickpeas Should You Use?
Selecting the right type of chickpeas, whether dried or canned, can impact the soaking and cooking process, influencing the final taste and texture of your dishes.
Regarding dried chickpeas, they typically require an overnight soak in water to soften them before cooking. This soaking process not only rehydrates the chickpeas but also helps to reduce the cooking time and enhance their flavor profile.
On the other hand, canned chickpeas are pre-cooked and preserved in liquid, allowing for quicker preparation. They may lack the firm texture and nutty taste of dried chickpeas. The choice between dried and canned chickpeas ultimately depends on the convenience factor versus desired texture and flavor in your dishes.
How Much Chickpeas Should You Soak?
Determining the right quantity of chickpeas to soak depends on the recipe requirements, serving size, and cooking method you intend to use.
When following recipes that call for chickpeas, look for specific measurements such as cups or grams. If a recipe serves four people, for instance, the quantity of chickpeas required will be different from a recipe serving ten. It is crucial to adjust the quantity of chickpeas for soaking as per the portions to achieve the desired taste and consistency.
Consider the cooking method. If you plan to cook the chickpeas in a stew or curry where they will absorb liquid, you may need to soak more than if you were roasting them for a salad. Experimentation and experience will give you a good sense of how to adjust the quantities to suit your culinary needs.
What Container Should You Use for Soaking?
Choosing the right container for soaking chickpeas is crucial to ensure proper water absorption and safe storage during the soaking process.
When selecting a container, it is essential to consider its size. A container that is too small might not provide enough room for the chickpeas to expand adequately. On the other hand, a container that is too large could lead to excess water exposure, potentially causing spoilage. Optimal container material can also impact the soaking process. Non-reactive materials, such as glass or food-grade plastic, are ideal to prevent any chemical interactions that might affect the taste or quality of the chickpeas.
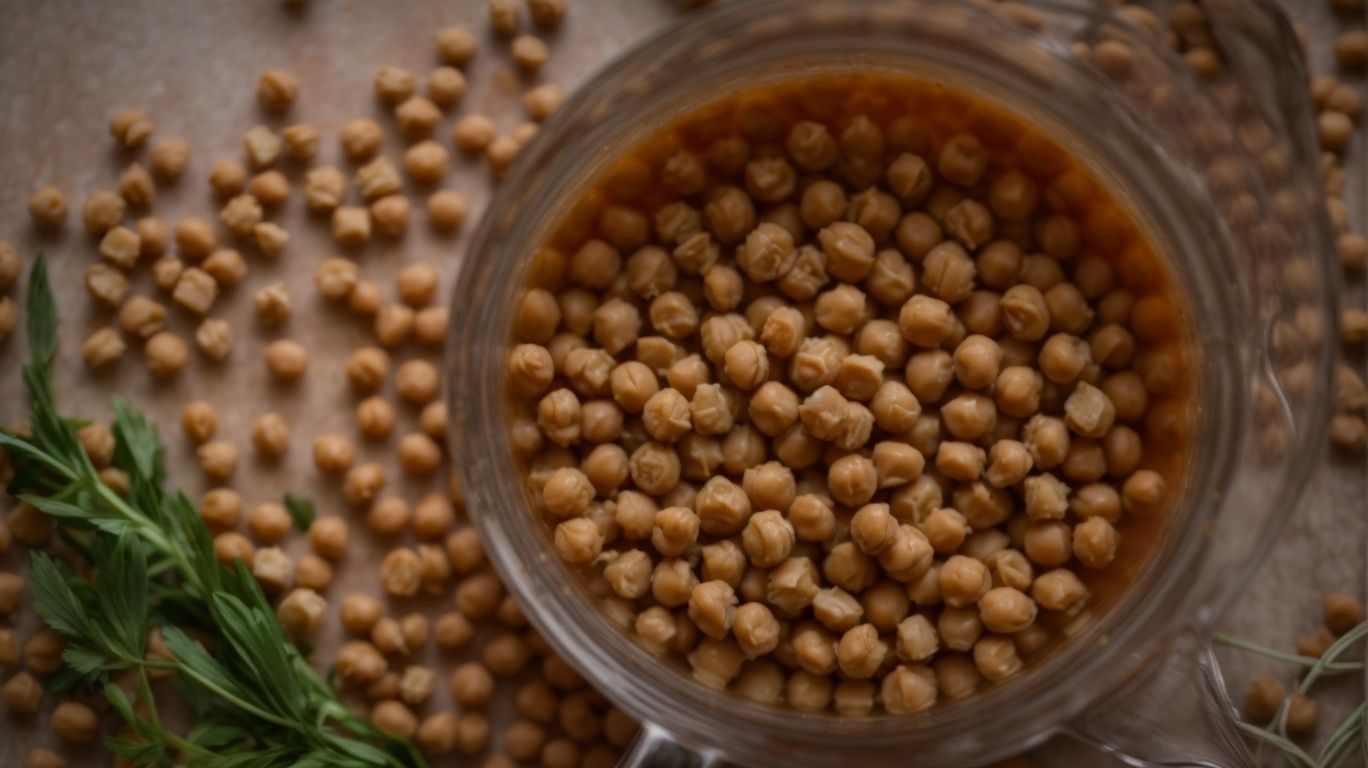
Steps for Soaking Chickpeas Overnight
Following the correct steps for soaking chickpeas overnight is essential to ensure they reach the desired tenderness and are ready for cooking in your favorite recipes.
Start by rinsing your chickpeas under cold running water in a fine-mesh sieve to remove any debris or dirt. Use your hands to agitate them gently, ensuring all the chickpeas are well-rinsed.
Select a container that is large enough to accommodate the chickpeas and allows room for expansion. A glass bowl or plastic container works well for this purpose.
Place the rinsed chickpeas in the container and cover them with water so that there is at least a couple of inches of water above the chickpeas.
Ensure the chickpeas are fully submerged as they will absorb the water during the soaking process.
Let the chickpeas soak in the water overnight or for a minimum of 8 hours. The longer soaking time helps in softening the chickpeas for better cooking results.
Step 1: Rinse the Chickpeas
The first step in soaking chickpeas is to thoroughly rinse them with water to remove any debris, dirt, or impurities that may affect the soaking and cooking process.
Rinsing chickpeas before soaking is essential to ensure that you start with clean legumes, free of any contaminants that might be present from packaging or storage. This simple act not only helps in enhancing the overall flavor of the chickpeas but also plays a crucial role in the overall digestibility of the legumes.
Thorough rinsing also removes excess starch from the surface of the chickpeas, which can lead to a smoother texture and better consistency after they have been soaked and cooked. By paying attention to this preliminary step, you are setting the stage for a successful and delicious chickpea dish.
Step 2: Place the Chickpeas in a Container
After rinsing, transfer the chickpeas to a suitable container that allows them to be completely covered by water for the soaking process to be effective.
When selecting a container, opt for one that has enough room for the chickpeas to expand as they soak. A glass or ceramic bowl works well, or a food-safe plastic container if preferred. Ensure the container is clean and sanitized before use to prevent any contamination. Cover the container with a lid or plastic wrap to retain moisture and prevent any debris from entering. Place the container in a cool, dry spot away from direct sunlight. Check the chickpeas periodically and add water if needed to maintain proper coverage.
Step 3: Add Water to Cover the Chickpeas
Ensure the chickpeas are fully submerged in water by adding enough liquid to cover them, as this is essential for the soaking process to be successful.
This step ensures that the chickpeas absorb water uniformly, leading to even cooking and a creamy texture once they are ready. Properly soaked chickpeas cook faster and more evenly, making them easier to blend or incorporate into dishes like hummus or falafel. The water also helps soften the chickpeas’ tough outer skin and aids in breaking down complex sugars, making them easier to digest. Covering chickpeas completely with water prevents them from drying out and ensures they retain their natural moisture content.
Step 4: Cover and Let Sit Overnight
Cover the container with a lid or suitable covering and allow the chickpeas to soak overnight, giving them ample time to absorb water and achieve the desired tenderness.
During this overnight soak, the chickpeas slowly plump up as they rehydrate, resulting in a softer texture and a more even consistency once they are cooked.
This process is essential for breaking down complex sugars and reducing the compounds that can cause digestive discomfort, making the chickpeas easier to digest and absorb nutrients from.
Opting for the overnight soak not only enhances the chickpeas’ digestibility but also contributes to a more flavorful and evenly cooked final dish.
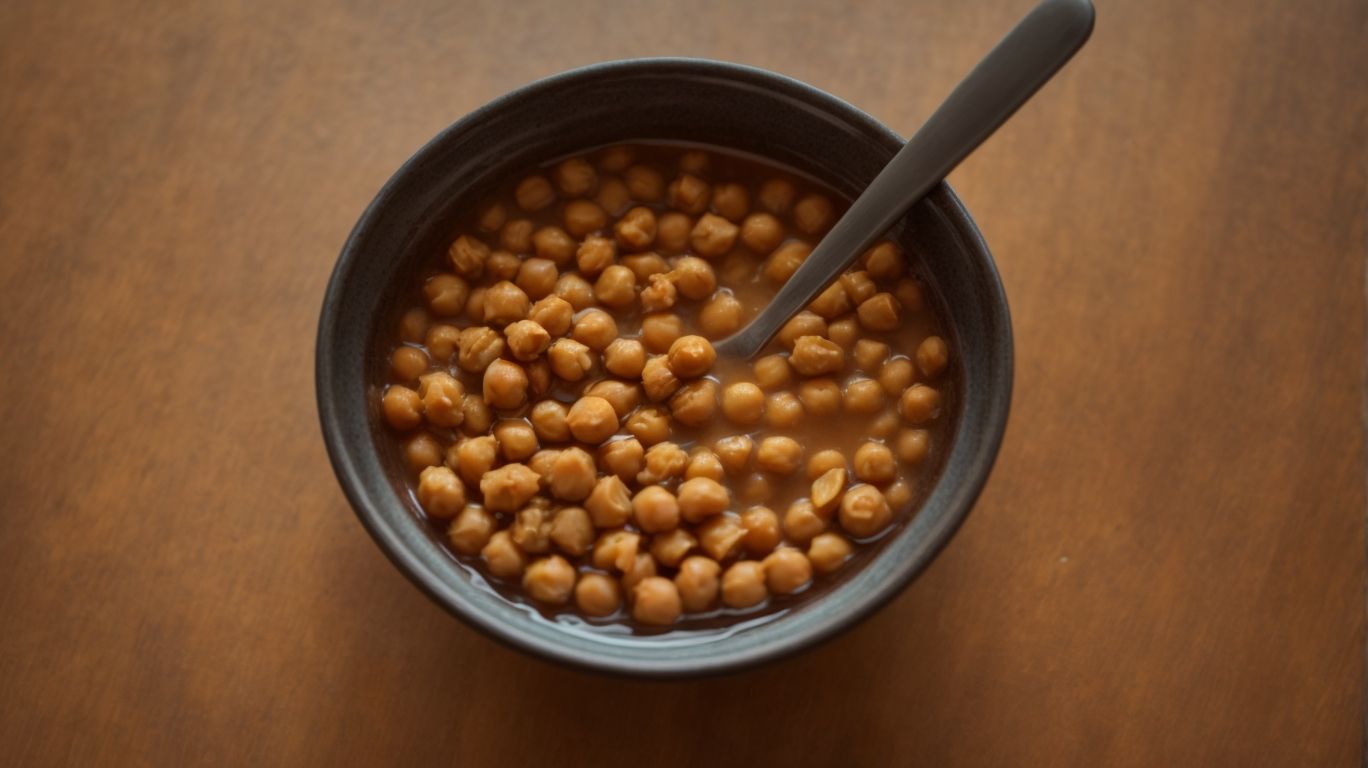
How to Cook Chickpeas After Soaking Overnight
Credits: Poormet.Com – Austin Allen
Cooking chickpeas after soaking them overnight involves specific steps to ensure they are tender, flavorful, and ready to be used in a variety of dishes ranging from salads to stews.
Once the chickpeas have soaked overnight, the next crucial step is the actual cooking process. There are several methods to choose from:
- Stovetop: Drain the soaked chickpeas and place them in a large pot. Cover them with fresh water and bring to a boil. Reduce the heat and let them simmer for about 1-1.5 hours until tender.
- Pressure Cooker: Transfer the soaked chickpeas to a pressure cooker, add water, and cook under pressure for about 15-20 minutes. This method significantly reduces cooking time.
- Slow Cooker: Combine the soaked chickpeas and water in a slow cooker. Cook on low for 8-10 hours or on high for 4-5 hours until soft and creamy.
Regardless of the cooking method chosen, adding aromatics like garlic, onion, bay leaves, or kombu during the cooking process can enhance the flavor of the chickpeas. Salt should be added towards the end of cooking to prevent toughening of the beans. Once cooked to the desired tenderness, drain the chickpeas and store them in the fridge for up to 3-4 days, or freeze them for later use in recipes such as hummus, curries, and soups.
Step 1: Drain and Rinse the Soaked Chickpeas
After soaking chickpeas overnight, drain the soaking liquid and rinse the chickpeas under running water to remove excess starch and prepare them for cooking.
This crucial step of draining and rinsing the soaked chickpea serves a vital role in enhancing the final dish’s flavor and texture. By removing the excess starch, the cooked chickpeas achieve a firmer texture and a nuttier taste. Rinsing also helps to cleanse the chickpeas, ensuring a cleaner ingredient for your recipes. In addition, eliminating the residual starch reduces the chances of excess foam formation during cooking, leading to a smoother and more visually appealing dish.
Step 2: Add the Chickpeas to a Pot
Transfer the drained and rinsed chickpeas to a cooking pot or saucepan, where they will be further prepared through simmering to achieve the desired tenderness.
Choosing the right pot for cooking chickpeas is crucial. Opt for a heavy-bottomed pot to ensure even heat distribution and prevent burning. This vessel helps retain moisture, allowing the chickpeas to cook evenly and absorb flavors.
When simmering, cover the pot partially to regulate the heat, preventing excessive evaporation. This slow cooking method softens the chickpeas gently, resulting in a creamy texture. The pot’s material, like stainless steel or cast iron, can also enhance the chickpeas’ taste by imparting subtle notes to the dish.
Step 3: Cover with Water and Bring to a Boil
Cover the chickpeas with fresh water in the pot and bring them to a boil, adding seasonings such as salt, garlic, or other preferred flavors to enhance the taste.
Boiling chickpeas with the right amount of water is crucial in ensuring a perfectly cooked and tender texture. This process allows the chickpeas to absorb the flavors of the seasonings, creating a rich and aromatic dish. Water plays a vital role in softening the chickpeas, breaking down their fibers, and making them more digestible. As the chickpeas simmer, the water turns into a flavorful broth that infuses the legumes with a savory essence. By carefully managing the boiling phase, you can achieve a dish that is not only nutritious but bursting with delightful flavors.
Step 4: Reduce Heat and Simmer Until Tender
Once the chickpeas have boiled, reduce the heat to a simmer and allow them to cook until they reach the desired level of tenderness, ensuring they are soft and flavorful.
Simmering the chickpeas after boiling is a crucial step in the cooking process. This gentle cooking method helps to further tenderize the chickpeas and allow them to absorb flavors from any added seasonings or ingredients. By simmering the chickpeas, you are giving them the opportunity to slowly cook through without becoming mushy or losing their shape.
The texture of the chickpeas greatly depends on how long they are simmered for; shorter simmering times result in firmer chickpeas, while longer simmering times yield softer, creamier chickpeas.
Simmering enhances the taste profile of the chickpeas by allowing the flavors to meld together, creating a more harmonious and well-balanced dish.
Step 5: Drain and Serve the Cooked Chickpeas
Once the chickpeas are tender and fully cooked, drain any excess liquid and serve them as a delightful addition to your favorite dishes or enjoy them on their own as a flavorful and nutritious snack.
Draining the chickpeas correctly is crucial to their final texture and taste. It’s best to use a colander to separate the chickpeas from the cooking liquid, but be sure to save some of the cooking liquid for recipes that may require it later on. Once drained, consider blotting the chickpeas gently with a paper towel to remove any excess moisture, enhancing their crispiness when roasted or added to salads.
Regarding serving, the options are endless. Create a vibrant salad by mixing cooked chickpeas with fresh vegetables, herbs, and a zesty dressing. Alternatively, season the chickpeas with your favorite spices and herbs, roast them until crispy, and enjoy them as a crunchy topping for soups or yogurt-based dips.
Frequently Asked Questions
What are the benefits of cooking chickpeas after soaking overnight?
Soaking chickpeas overnight helps to soften them, making them easier to cook and digest. It also reduces their cooking time and makes them more nutritious.
Can I cook chickpeas without soaking them overnight?
Yes, you can cook chickpeas without soaking them overnight, but it will take longer and they may not be as easy to digest. Soaking overnight is recommended for optimal results.
How do I properly soak chickpeas overnight?
Simply place the chickpeas in a large bowl and cover them with water. Make sure the water covers the chickpeas by at least 2 inches. Let them soak overnight or for at least 8 hours.
What is the best way to cook chickpeas after soaking them overnight?
One of the best ways to cook chickpeas after soaking them overnight is to simmer them in a pot of water for about 1-2 hours. You can also pressure cook them for faster results.
Can I freeze chickpeas after cooking them?
Yes, you can freeze chickpeas after cooking them. Make sure to let them cool completely before transferring them to an airtight container or freezer bag. They can stay fresh for up to 6 months in the freezer.
Are there any other ways to cook chickpeas after soaking them overnight?
Yes, you can also roast chickpeas in the oven for a crunchy snack or add them to soups, stews, and curries. You can also blend them to make hummus or use them in salads and wraps. The possibilities are endless!