

How to Bake Buns in Oven?
Craving warm, fluffy homemade buns fresh from the oven?
Our guide will take you through the essential ingredients and steps needed to bake perfect buns at home.
From preparing the dough to shaping and baking the buns, we’ve got you covered.
Learn how to tell when your buns are done and discover valuable tips for achieving bakery-quality results.
Stay tuned for variations and additions to elevate your bun game!
Key Takeaways:
What Are the Ingredients Needed for Baking Buns in Oven?
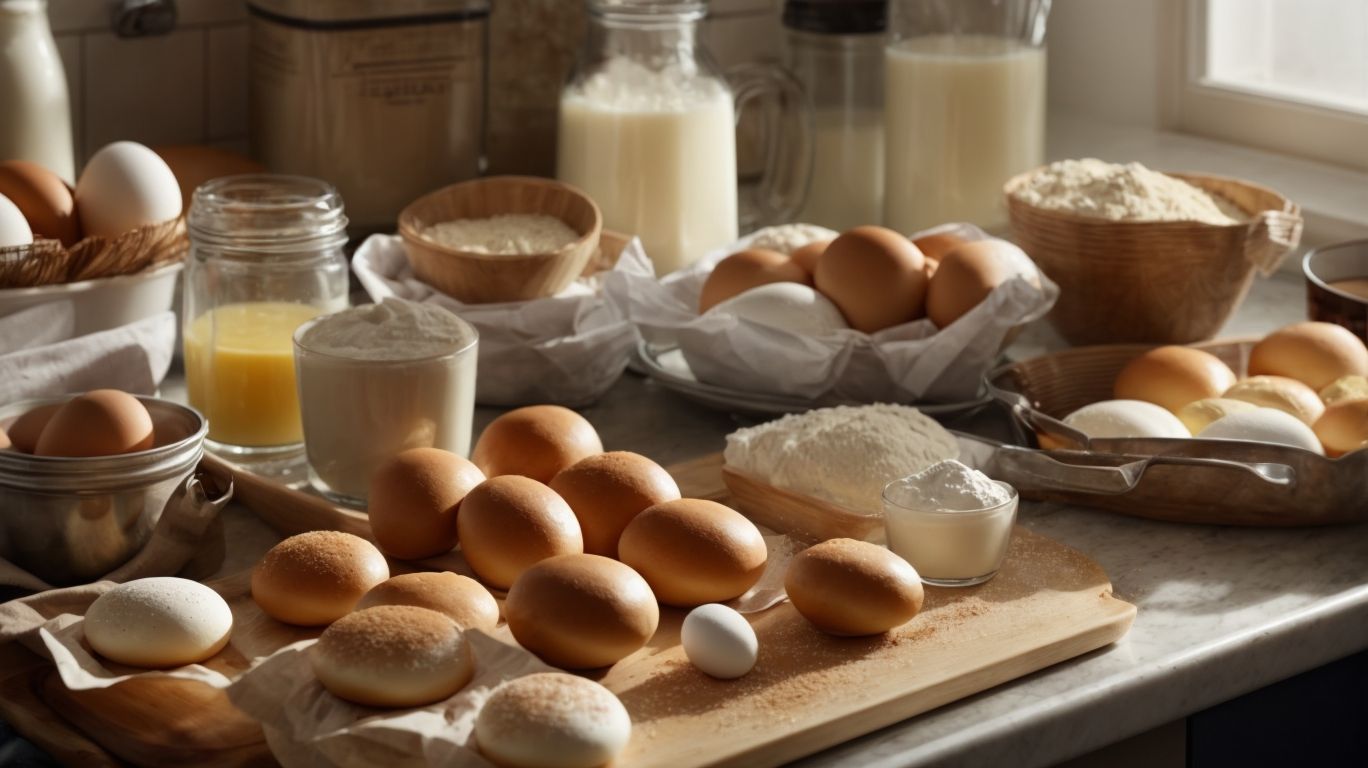
Credits: Poormet.Com – Lawrence Lopez
Baking delicious buns in the oven requires a handful of essential ingredients to create the perfect batch.
Among the key ingredients needed for these delectable buns are:
- Flour: forms the base of the dough and provides structure and volume.
- Yeast: a living organism, helps the dough rise by fermenting the sugars present.
- Sugar: adds sweetness and aids in caramelization, creating a golden crust.
- Salt: enhances flavors and controls yeast activity.
- Butter: enriches the dough, adding moisture and richness.
- Milk or water: hydrates the mixture, creating the desired consistency.
- Eggs: contribute to the buns’ texture, color, and richness.
Flour
Flour is the fundamental ingredient in baking buns, providing the structure and texture to the final product.
Understanding the type of flour to use is essential in achieving the desired outcome. All-purpose flour is a popular choice, offering a balance between protein content and starch for a fluffy texture. On the other hand, whole wheat flour adds a nutty flavor and denser texture to the buns.
The type of flour used significantly impacts the consistency and taste of the buns, making it crucial to choose wisely. Measuring flour correctly is key to ensure the right ratio of dry to wet ingredients, preventing a dough that is either too sticky or dry.
Yeast
Yeast is a crucial ingredient that helps the buns rise and develop their fluffy texture during baking.
Yeast, a living organism, performs the essential role of fermentation, producing carbon dioxide gas that gets trapped in the dough, causing it to rise. To activate yeast successfully, it needs to be dissolved in lukewarm liquid and fed with a pinch of sugar to kickstart its activation.
Proofing times vary depending on the type of yeast used; instant yeast requires shorter proofing periods than active dry yeast. The type of yeast used impacts the flavor profile and texture of the buns, with some adding a subtle tanginess or enhancing softness.
Sugar
Sugar adds sweetness to the buns while also aiding in the fermentation process when combined with yeast.
When sugar is added to the buns, it not only enhances the taste but also helps in activating the yeast, leading to a fluffy and airy texture. The role of sugar in baking goes beyond just sweetness. Different types of sugars, such as granulated sugar, brown sugar, or honey, can be used to create varying flavors and textures in the buns.
To control the sweetness levels, bakers can experiment with the amount and type of sugar used in the recipe.
- Reducing the sugar content slightly can still provide enough sweetness while making the buns healthier.
Balancing the sugar content is crucial in achieving the perfect flavor profile without overpowering the other ingredients.
Salt
Salt is a crucial ingredient that enhances the flavor profile of the buns and balances the sweetness from other ingredients.
Regarding baking, salt plays a pivotal role beyond just adding a savory touch. Salt intensifies the flavors present in the dough, allowing the nuances of ingredients like butter, eggs, and sugar to shine through. Moreover, salt is not just a flavor enhancer; it also contributes to the development of the dough structure by regulating yeast activity and gluten formation.
Proper salt measurement is essential in baking buns. Too little salt can result in a flat, dull-tasting product, while excessive salt can overpower the other flavors. Different types of salt, such as kosher salt, sea salt, and table salt, can vary in intensity and texture, influencing the final taste and texture of the buns. So, choosing the right type and quantity of salt is key to achieving perfectly balanced and delicious buns.
Butter or Oil
Butter or oil adds richness and moisture to the buns, resulting in a softer texture and enhanced flavor.
When deciding between butter and oil for your buns, it’s important to consider their distinct qualities.
Butter lends a rich, buttery taste to the buns and helps achieve a tender crumb, while oil contributes to a moister texture and a lighter feel.
If you opt for butter, ensure it is at room temperature to incorporate easily into the dough, while with oil, you can add it directly without worrying about its temperature.
Selecting the right fat can impact not only the taste but also the overall mouthfeel of your buns.
Milk or Water
Milk or water serves as the liquid component in the bun dough, contributing to its hydration and overall consistency.
The choice between milk and water in bun dough preparation significantly impacts the final outcome. Milk, being richer in fat and protein compared to water, adds a creamier texture and enhances the flavor profile of the buns. On the other hand, water might result in a lighter and fluffier texture but with a milder taste. Consider the desired richness and texture when selecting between the two.
The temperature of the milk or water used is crucial for yeast activation and dough development. For instance, warm milk activates the yeast more effectively, aiding in a quicker rise of the dough. In contrast, using cold water might slow down the fermentation process, resulting in a longer proofing time. Pay attention to the recipe instructions regarding the suggested temperature of the liquid to achieve the desired bun texture and flavor.
Eggs (Optional)
Adding eggs to the bun dough can enrich the flavor, add richness, and enhance the color of the final product.
When considering including eggs in bun recipes, it is important to note that eggs play a crucial role in determining the structure and texture of the buns. The proteins in the eggs help bind the ingredients together, resulting in a more tender and cohesive crumb. Eggs contribute to the moisture content of the dough, leading to a softer and more velvety texture in the finished buns.
To effectively incorporate eggs into the dough, ensure they are at room temperature before adding them to the other ingredients. This helps in achieving better blending and distribution throughout the dough. Mixing the eggs gently into the dough until just combined, without overmixing, is key to avoid toughness in the buns.
How to Prepare the Dough for Buns?
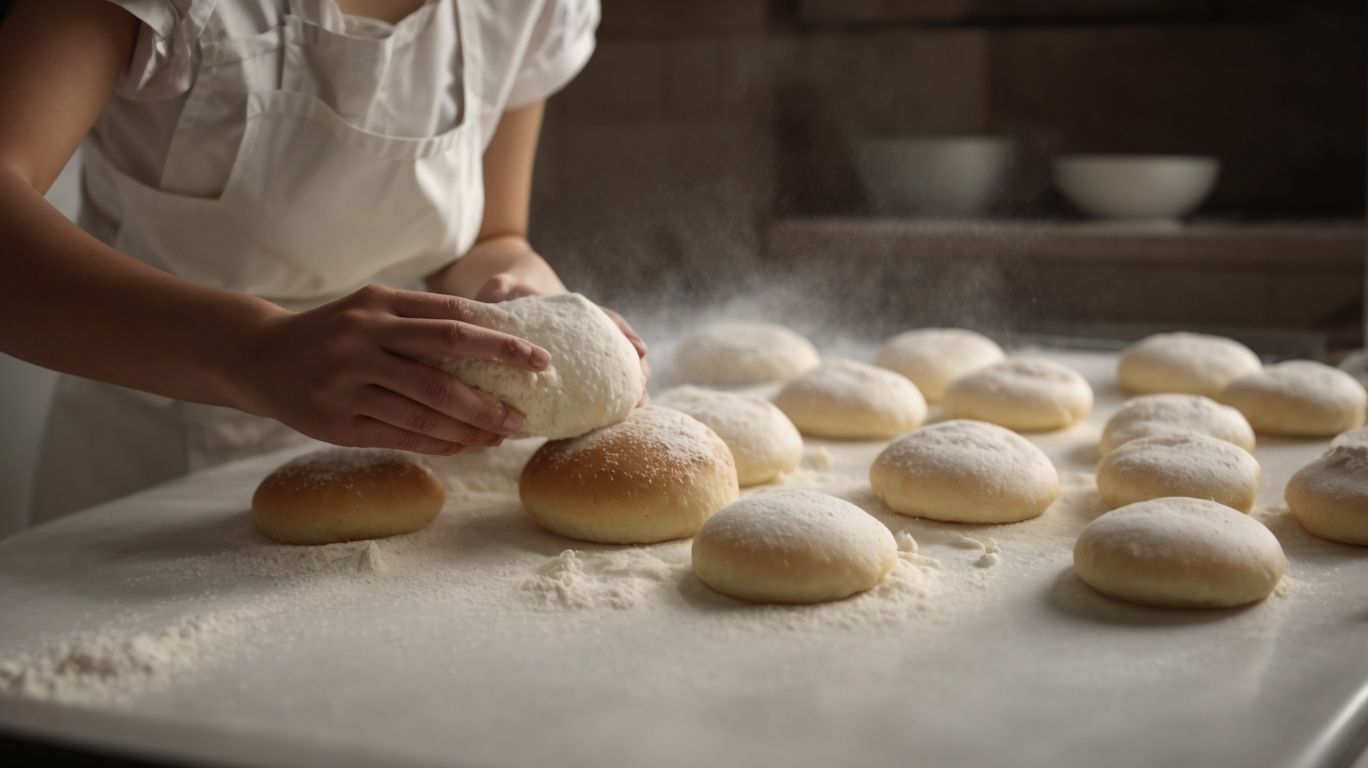
Credits: Poormet.Com – Thomas Baker
Preparing the dough for buns involves a series of steps from mixing the ingredients to letting the dough rise to perfection.
Once you have gathered your ingredients, start by mixing the flour, yeast, sugar, salt, and any other dry ingredients in a large bowl. Make a well in the center before pouring in the warm water and melted butter. Use a wooden spoon to combine the mixture until a shaggy dough forms.
Now comes the critical part – kneading. Turn the dough out onto a floured surface and knead it by pushing, folding, and turning it. This process helps develop the gluten, which gives the dough its elasticity and structure.
If the dough feels too dry or wet, adjust by adding more water or flour gradually until you reach the ideal consistency – smooth, slightly tacky, and elastic.
Mixing the Ingredients
The initial step in preparing bun dough is meticulously mixing the ingredients to achieve a uniform and smooth consistency.
It is crucial to follow a specific order when incorporating the ingredients into the dough. Begin by combining the dry ingredients, such as flour, sugar, salt, and yeast, in a large mixing bowl. Then, gradually add the liquid ingredients, like water, milk, and melted butter, while continuously mixing to form a shaggy dough.
To ensure all components are properly combined, utilize various mixing techniques such as stirring, folding, and kneading. These methods help distribute the ingredients evenly and develop gluten for a consistent texture.
Avoid overmixing the dough, as it can result in tough buns. Achieving a cohesive dough that is smooth, elastic, and slightly tacky is the aim. Test the dough by performing a windowpane test, where you stretch a small portion to see if it forms a thin translucent membrane without tearing.
Kneading the Dough
Kneading the bun dough is a crucial step that develops gluten and ensures proper structure and texture in the final product.
Effective kneading helps distribute the yeast evenly, aiding in fermentation and ensuring a good rise. To knead effectively, place the dough on a lightly floured surface and push it away from you with the heel of your hand. Fold the dough back on itself, rotate it slightly, and repeat. Incorporating this push, fold, and turn technique aerates the dough and strengthens gluten formation.
Properly kneaded dough should feel smooth, elastic, and slightly tacky. When pulling a piece of dough, it should stretch without tearing, forming a thin translucent membrane, known as the windowpane effect. Achieving the desired dough consistency through kneading is essential for light, airy buns with a tender crumb.
Letting the Dough Rise
Allowing the bun dough to rise is a critical stage that enables fermentation and expansion, resulting in light and airy buns.
During this process, the yeast in the dough consumes sugars, releasing carbon dioxide gas which creates air pockets, giving the buns their characteristic fluffy texture. To ensure an optimal rise, place the dough in a warm, draft-free environment, around 75-85°F, for a specified amount of time depending on the recipe. Covering the dough with a damp cloth or plastic wrap prevents moisture loss and aids in creating the right humidity level essential for fermentation. Patience is key, as allowing enough time for the dough to double in size is crucial for the flavors to develop and the texture to become light and airy.
Shaping and Baking the Buns
After the dough has risen, shaping and baking the buns is the final step to transform the dough into delectable baked treats.
Regarding shaping the buns, there are various techniques you can employ. One common method is rolling out the dough into a long cylinder and then cutting it into equal-sized portions. Alternatively, you can divide the dough into individual portions and shape them into round balls. For a more creative touch, try braiding the dough for a visually appealing presentation.
Once you have shaped the buns, preheat your oven to the recommended temperature, usually around 375°F to 400°F. Place the buns on a baking sheet lined with parchment paper, leaving enough space between each to allow for expansion.
Shaping the Buns
Shaping the bun dough into individual portions or unique designs adds an aesthetic appeal to the final baked goods.
There are several tried-and-true methods to achieve beautifully shaped buns that not only look enticing but also bake uniformly. Starting with traditional bun shapes like the classic round ball or elongated oval provides a simple yet appealing presentation. For those seeking to elevate their baking game, intricate decorative patterns such as crisscross cuts or twisted designs impart a professional touch. Experimenting with creative shapes like braids or knots can turn ordinary buns into eye-catching delights. To ensure consistent baking results, pay attention to the size and weight of each portion, using tools like a kitchen scale for precision.
Preheating the Oven
Preheating the oven to the correct temperature is essential for ensuring even baking and proper rise of the buns.
When you preheat the oven, you allow the entire appliance to reach the desired temperature, ensuring that your buns start baking at the right heat level from the moment they go in. This initial burst of heat helps activate the leavening agents in the dough, promoting a good rise and creating that light, fluffy texture we all crave in our buns.
For yeast-based buns, a preheated oven set at around 375-425°F (190-220°C) is usually optimal, whereas denser buns like bagels might benefit from a slightly higher temperature of 400-450°F (200-230°C) to develop that crispy crust.
Fail to preheat the oven properly, and your buns may end up undercooked in the center, or conversely, overcooked on the outside. Proper temperature plays a crucial role in achieving that golden-brown exterior and soft, tender crumb inside.
To ensure consistent results, it’s recommended to preheat your oven for at least 15-20 minutes before adding your buns for baking. Remember to maintain your oven regularly by cleaning it to prevent any temperature discrepancies that could affect the baking process.
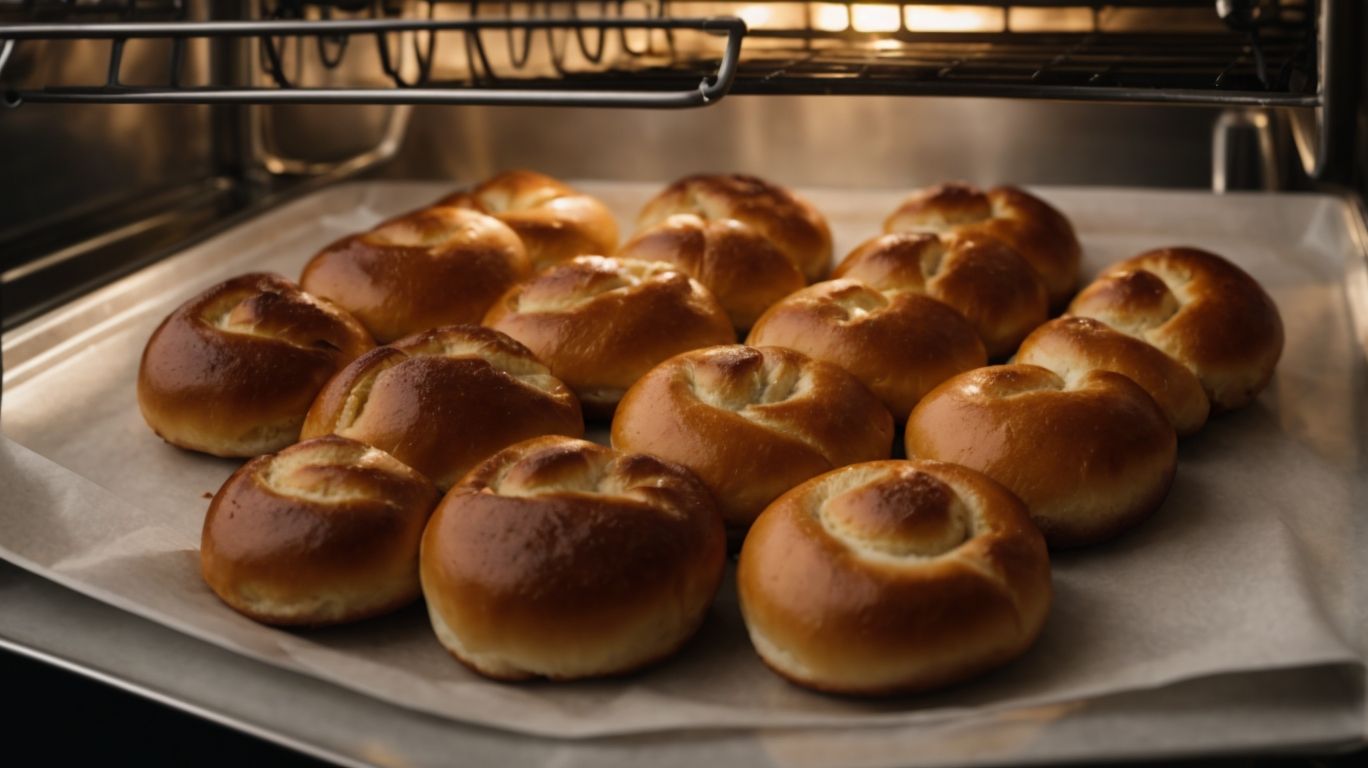
Baking the Buns
Baking the bun dough in a preheated oven results in beautifully golden and fragrant buns that are ready to be enjoyed.
For the perfect buns, it is essential to ensure that the oven is preheated to the recommended temperature specified in your recipe, usually around 375 to 400°F.
Once the buns are in the oven, the baking time can vary depending on the size and type of bun. Larger buns may require a longer baking time, while smaller ones might be ready sooner.
To achieve a desired crust, consider brushing the buns with an egg wash before baking. This not only adds a beautiful sheen but also helps in browning the top of the buns perfectly.
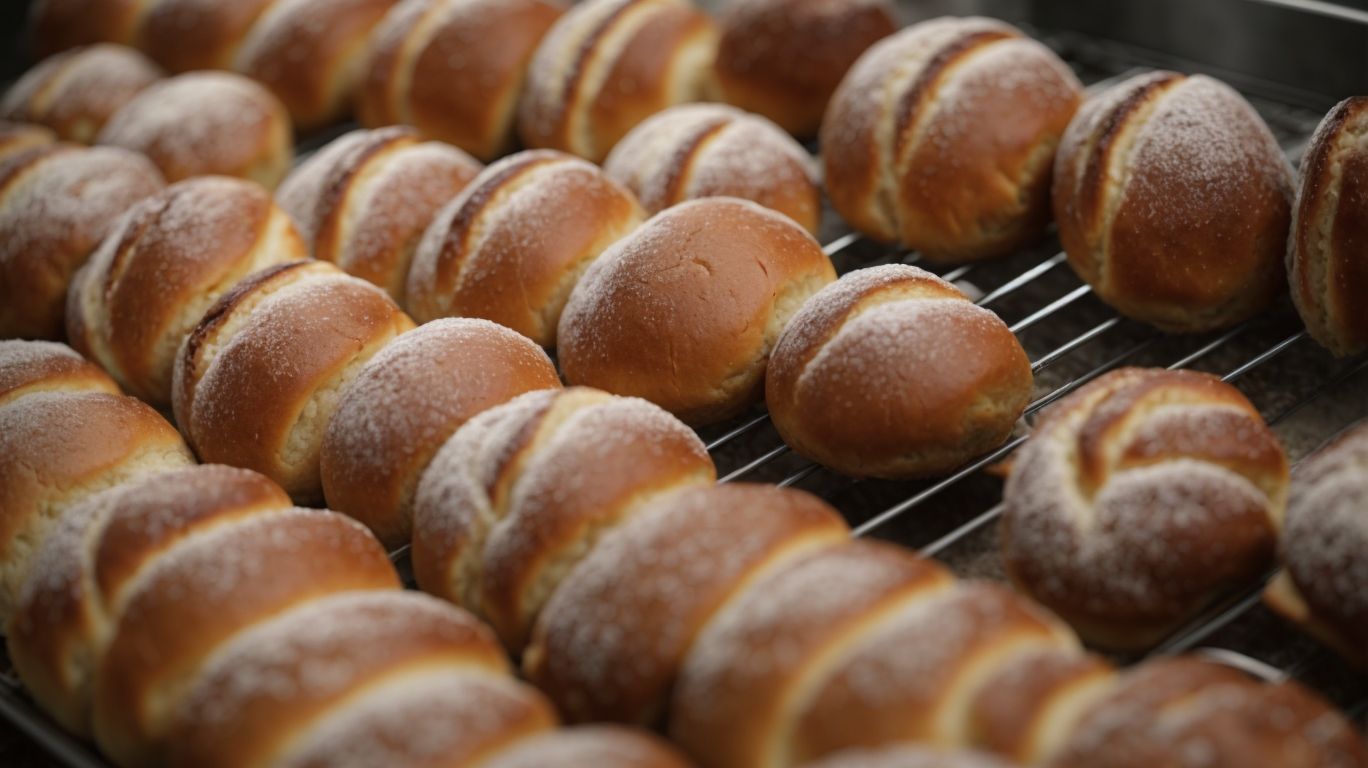
How to Tell When the Buns are Done?
Credits: Poormet.Com – Jason Clark
Determining the perfect doneness of buns involves visual cues, aroma, and a gentle tap test to ensure they are baked to perfection.
When evaluating the color of your buns, aim for a golden-brown hue for a classic finish. Avoid buns that are pale or overly dark, as these could indicate underbaking or overbaking, respectively. Pay attention to the aroma emanating from the oven; a warm, inviting smell suggests that the buns are reaching the ideal state. A simple yet effective method is the touch test – gently press the bun’s top, and if it springs back, they are likely fully baked. If it leaves an indentation, give them a little more time in the oven.
Tips for Perfectly Baked Buns
Credits: Poormet.Com – Kevin White
Achieving perfectly baked buns requires attention to detail, precision in measurements, and a few expert tips to elevate your baking game.
One key aspect in perfecting your buns is ensuring your oven is properly calibrated. Invest in an oven thermometer to guarantee accurate temperatures, as slight variations can impact the final outcome significantly. Ingredient quality is another crucial factor. Opt for fresh, high-quality ingredients to enhance the flavor and texture of your buns. Consider experimenting with different types of flour, such as whole wheat or rye, to impart unique flavors.
When troubleshooting common issues, like uneven baking or dense texture, evaluate your mixing technique. Properly kneading the dough is essential to develop gluten and achieve that desired airy texture. Storage practices also play a significant role in maintaining freshness. Store your buns in airtight containers or resealable bags to prevent them from drying out or becoming stale.
Variations and Additions for Buns
Transform your basic bun recipe into a culinary masterpiece by exploring various flavor additions, fillings, and creative twists.
One way to elevate your buns is by incorporating unexpected ingredients like chocolate chunks, matcha powder, or dried fruits into the dough for a unique taste profile. Experiment with savory fillings such as bacon and cheese, sun-dried tomatoes and basil, or caramelized onions to add a savory touch to your buns.
For a visual twist, consider adding a crunchy streusel topping, a drizzle of glaze, or sesame seeds for added texture and flavor. Presentation-wise, you can shape your buns into intricate flower patterns, braids, or knots to make them visually appealing.
Conclusion
Mastering the art of baking buns involves a harmonious blend of quality ingredients, precise techniques, and creative experimentation to achieve delightful results.
Key to success in making delightful buns lies in selecting fresh ingredients such as flour, yeast, salt, sugar, and milk to ensure flavor and texture perfection.
Employing precise dough preparation methods like kneading, resting, folding, and shaping plays a crucial role in achieving the desired lightness and fluffiness.
Regarding baking, be mindful of the temperature control and duration in the oven for that golden crust and soft interior, making your homemade buns a truly rewarding endeavor. So, why not give it a try and elevate your culinary skills with these delectable treats!
Frequently Asked Questions
How to Bake Buns in Oven?
What ingredients do I need to bake buns in the oven?
To bake buns in the oven, you will need flour, yeast, sugar, salt, butter, milk, and eggs.
Can I use a regular baking pan to make buns in the oven?
Yes, you can use a regular baking pan to make buns in the oven. However, if you want perfectly shaped buns, you can use a muffin tin or a baking sheet with the edges folded up.
How long should I bake the buns in the oven for?
The baking time can vary depending on the size of your buns and the temperature of your oven. Typically, buns should be baked for 12-15 minutes at 375 degrees Fahrenheit.
Can I freeze the buns before baking them in the oven?
Yes, you can freeze the buns before baking them. Simply place them on a baking sheet and freeze until solid, then transfer to a freezer-safe bag or container. When ready to bake, add an extra 5-10 minutes to the baking time.
Do I need to let the dough rise before baking the buns in the oven?
Yes, you will need to let the dough rise before baking the buns in the oven. This allows the yeast to activate and helps the buns to rise and become fluffy.
How do I know when the buns are done baking in the oven?
You can test if the buns are done by inserting a toothpick or skewer into the center of a bun. If it comes out clean, the buns are ready. You can also tap the top of a bun – if it sounds hollow, it’s done.